I’ve been involved a little bit with the process of porting RPiPlay to run on desktop Linux. RPiPlay is a program originally designed for the Raspberry Pi that acts as an AirPlay Mirroring server and supports mirroring your iOS device’s screen to your Raspberry Pi’s video out. Originally it only supported the Raspberry Pi, but antimof reworked the code to also work on desktop Linux with GStreamer, and I helped get it across the finish line and merged back into the main project.
A while ago, I noticed that when I ran RPiPlay in a VMware virtual machine during development, the video was messed up. It looked like some kind of horizontal synchronization issue. The image looked like it was stretching out further and further to the right on each successive line.
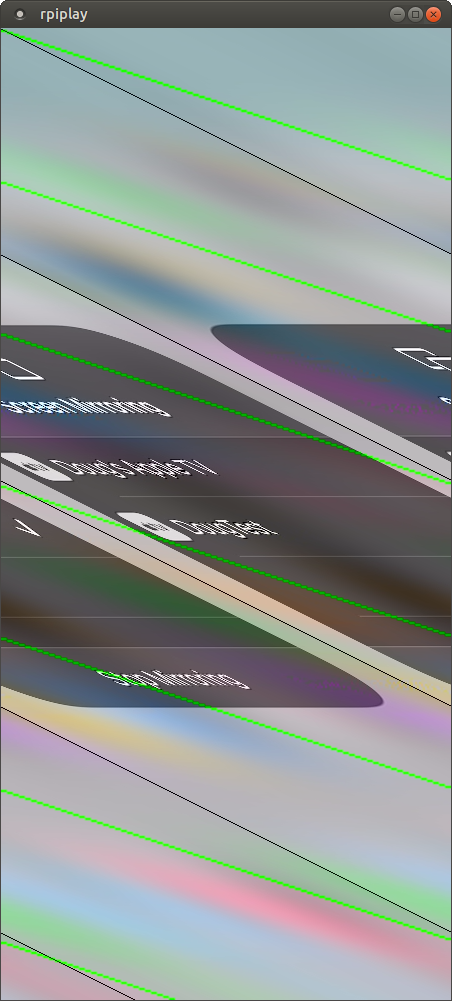
It worked fine on my laptop running Linux directly, which is probably the way most people use RPiPlay, so I didn’t think much more about it at the time. It bothered me though. It seemed to be a problem at a level deeper than RPiPlay, and I really wanted to understand why it was happening. So of course, I recently dug myself deep into a rabbit hole to try to figure it out.
I started out by trying to verify that it wasn’t a problem with RPiPlay itself. The way that RPiPlay works on desktop Linux is it forwards received H.264 packets to a GStreamer pipeline that interprets the data and displays it. The GStreamer pipeline in RPiPlay (simplified for brevity) looks like this:
appsrc ! queue ! decodebin ! videoconvert ! autovideosink
GStreamer is pretty intimidating at first, but luckily the project has a very useful tutorial to help with debugging. Using the GST_DEBUG environment variable, I was able to learn more about what was happening:
GST_DEBUG=4 ./rpiplay
The output I got was quite verbose and pretty complicated, but I was able to glean some interesting info by looking through it:
GST_PLUGIN_LOADING gstplugin.c:901:_priv_gst_plugin_load_file_for_registry: plugin "/usr/lib/x86_64-linux-gnu/gstreamer-1.0/libgstxvimagesink.so" loaded
GST_ELEMENT_FACTORY gstelementfactory.c:359:gst_element_factory_create: creating element "xvimagesink" named "video_sink-actual-sink-xvimage"
This told me that the autovideosink element was deciding to use an xvimagesink, which renders video using the XVideo extension. I tried modifying the source code to try some other image sinks instead, such as glimagesink. glimagesink actually worked fine and the video looked perfect. This told me that the problem likely had nothing to do with RPiPlay, and instead was something unique to the xvimagesink element that had been automatically selected. But it wasn’t as simple as just blaming xvimagesink, because xvimagesink worked fine on actual hardware. The problem only occurred with the combination of “inside of a VM while also using xvimagesink for display”. At this point I wanted to track down exactly what the difference was between hardware and VMware.
This was a bit of a roadblock at first, but the debugging tutorial I linked above earlier was a huge help. I used the GST_DEBUG_DUMP_DOT_DIR environment variable, combined with Graphviz, to get GStreamer to spit out detailed graphs of the final pipeline being used, both on hardware and VMware:


You can click the images to see better views of them, but it’s obvious just from looking broadly at the two images that the pipelines differ between VMware and my laptop. The laptop’s pipeline is more complicated. I wanted them to be as similar as possible to help eliminate possibilities for what might be wrong.
Looking closer at the graphs, the big difference is in the decodebin element. My laptop was using VAAPI for decoding, and VMware was using libav/FFmpeg. This makes sense — if I have hardware H.264 decoding available, why not use it? I wanted to force my laptop to not use VAAPI in order to get its actual GStreamer pipeline as close as possible to the pipeline being used in my VM. In order to do this, I set the LIBVA_DRIVER_NAME environment variable to a random string value. This forced the laptop to not use VAAPI, and resulted in a graph much closer to what I got from the VMware VM:

This still resulted in good video on the laptop and bad video in VMware. So the problem had nothing to do with FFmpeg. That’s good — this eliminated one potential source of the problem.
Comparing the two graphs at this point, there were two big differences:
- The laptop keeps the video in I420 format and feeds it directly to the xvimagesink, whereas VMware converts from I420 to YV12 first.
- The laptop uses a “GLAMOR Textured Video” device, whereas VMware uses an “XA G3D Textured Video” device.
The next question that jumped into my mind was: could this be a problem with the conversion process between I420 and YV12? So I tried to eliminate the conversion. It was around now that I realized I could use GStreamer to simulate a video source instead of having to test using RPiPlay. So I created a simple pipeline and ran it on both computers using gst-launch-1.0:
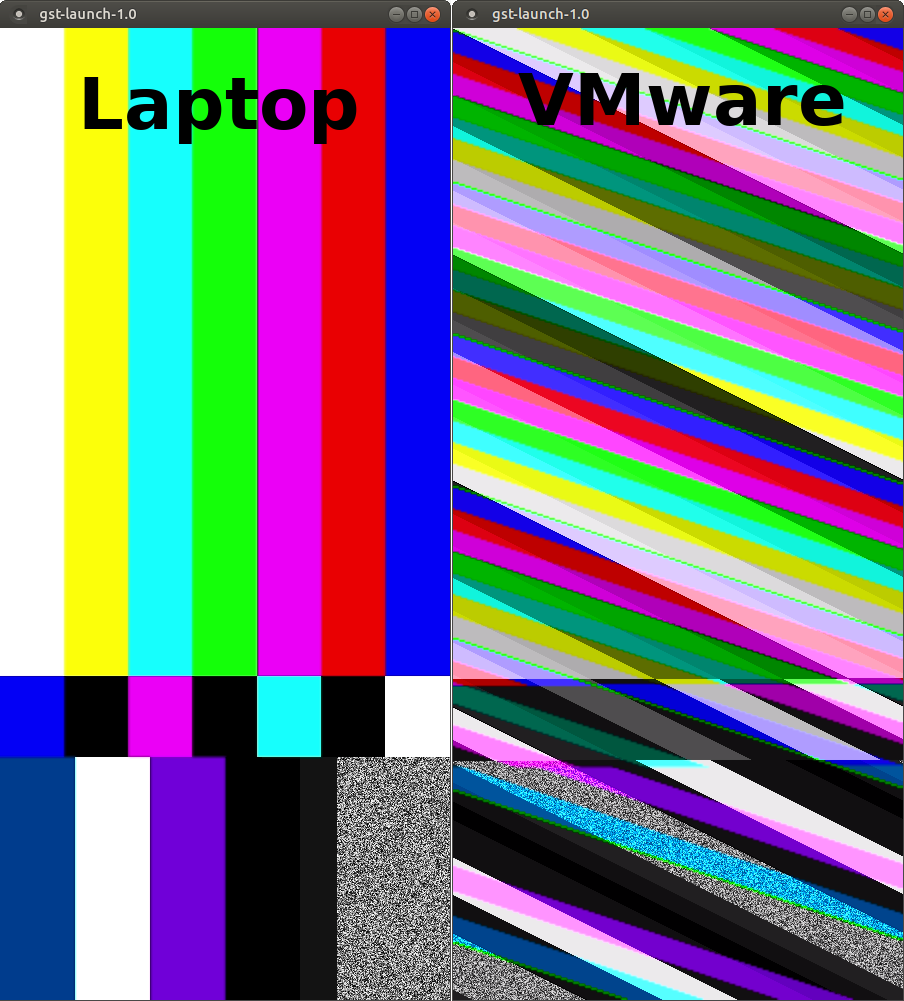
gst-launch-1.0 videotestsrc ! video/x-raw,format=YV12,width=450,height=972 ! xvimagesink
This command simply instructs GStreamer to create a 450×972 YV12 test source and feed it directly to the xvimagesink. In case it’s not clear, 450×972 is the size of the video that RPiPlay was sending to GStreamer, determined by looking at the graphs above. Here’s the resulting video display I got on the laptop and VMware:
I repeated the GST_DEBUG_DUMP_DOT_DIR experiment with this pipeline, and the resulting graphs were identical — 450×972 YV12 video being fed directly to the xvimagesink. The only difference was the device name. GLAMOR Textured Video worked fine, and XA G3D Textured Video didn’t. This eliminated GStreamer’s video conversion as being the problem. It pretty much pointed the finger at XA G3D Textured Video being the problem. Either it, or something further down the line used by it such as a kernel driver.
I also decided to do some other experimentation. By running the xvinfo command in VMware, I could see what different display formats were supported by the XA G3D Textured Video device. It also supported two other formats:
Number of image formats: 3
  id: 0x59565955 (UYVY)
    guid: 55595659-0000-0010-8000-00aa00389b71
    bits per pixel: 16
    number of planes: 1
    type: YUV (packed)
  id: 0x32595559 (YUY2)
    guid: 59555932-0000-0010-8000-00aa00389b71
    bits per pixel: 16
    number of planes: 1
    type: YUV (packed)
  id: 0x32315659 (YV12)
    guid: 59563132-0000-0010-8000-00aa00389b71
    bits per pixel: 12
    number of planes: 3
    type: YUV (planar)
Replacing the YV12 format code in the above GStreamer command with UYVY or YUY2 resulted in video that looked great at any resolution. So this problem seemed to be limited to YV12. I also randomly decided to further experiment by changing the video width and height. I realized that the height didn’t matter. It was all about the width. YV12 video looked good as long as the width was a multiple of 8 (or one less than a multiple of 8). So for example, widths of 447, 448, 455, or 456 all looked great, but 449 through 454 had display issues. This new discovery also caused me to realize that RPiPlay displayed perfectly fine in VMware if I had my phone oriented horizontally instead of vertically.
To recap where I was at this point: I had eliminated GStreamer as being the problem, and what I had as my next clue was the name of a device: XA G3D Textured Video. I needed to dig into the code for this device and figure out if this was where the problem was, or if it was somewhere deeper. Some quick Googling easily led me to discover that the device I was dealing with was created by the xf86-video-vmware Xorg video plugin.
It was obvious that I was looking in the correct codebase because I found several switch statements dealing with YV12, UYVY, and YUY2. I had to learn what was going on in this code. This also required having a better understanding of what the YV12 video format looks like. This site was a lot of help. I’m probably butchering the terminology a bit, so be easy on me if you’re an expert in the field. But I want to explain as best as I am capable: YV12 is a YUV format, meaning rather than red/green/blue color data for each pixel, it’s stored as luminance and chrominance of each pixel. Luminance is just what the image would look like if it were in grayscale, and chrominance is color info. The way the YV12 format works is there are three separate planes stored sequentially in the image data, which is why it’s called a “planar” format. The first plane is the Y (luminance) plane, and it is composed of width*height bytes. One byte per pixel. So a grayscale image. The second and third planes are the U and V planes, which are blue and red offsets, respectively. We humans are better at seeing brightness than color, so we cheat with this format and only store one U byte and one V byte for every 4 pixels. For example, the top-left pixel in an image shares the same U and V samples as the pixels directly to the right, directly below, and directly diagonally to the bottom right. This means we only need width*height/4 “U” bytes and width*height/4 “V” bytes. It saves space at the expense of losing some color resolution that we can’t see very well anyway. If you do the math on this, it comes out to 12 bits of total data per pixel, as opposed to 24 bits per pixel for your typical RGB image.
Anyway, after staring at the xf86-video-vmware code and experimenting with it a bit, it eventually became apparent what was going on. First of all, the width and height are both rounded up so that they are a multiple of 2. This makes sense, because the U and V planes need width*height to be divisible by 4. Then, the Y plane data is stored in a way where if the width is not a multiple of 4, each horizontal line is padded with extra blank bytes at the end to make it a multiple of 4. The code refers to this as the “pitch”. Not only that, but the U and V planes (which are each half the width of the Y plane) also have their pitch as a multiple of 4. What this effectively means is if your image width is not a multiple of 8 pixels, the U and V planes will have extra padding bytes. If your image is not a multiple of 4 pixels, the Y plane will also have extra padding bytes. I believe the 4 byte pitch is useful for efficiency and memory alignment, but I’m not an expert on the reasons behind why.
Thinking about it, each line in the garbled video was looking like it was being shifted over a little bit more than the previous line. This would make perfect sense if we were accidentally interpreting those padding bytes as actual pixel data. And that’s exactly what was going on.
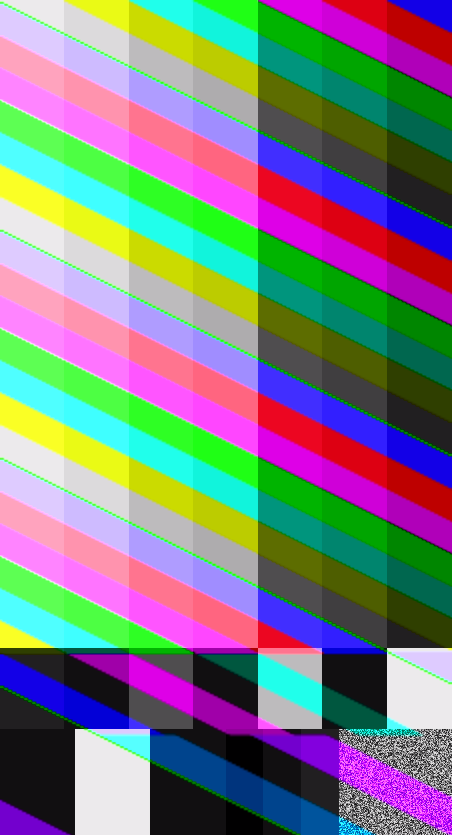
This also led me to realize that if the width was a multiple of 4, but not a multiple of 8, the black and white portion of the image would look perfect because the Y plane wouldn’t have any padding bytes, but the colors would be wrong because there would be padding in the U and V planes. You can see that depicted in the image to the left. If you look closely, the image looks good from a grayscale standpoint. There are just weird diagonal color bars on top of it that don’t match the image properly. That’s all because of the padding bytes in the U and V planes being interpreted as actual U and V image data.
I eventually discovered this section of the code, which takes the image data and copies it into surfaces for each plane. The code is directly copying width*height bytes into the Y plane, and width*height/4 bytes into the U and V planes. That is indeed the correct amount of data to copy, but if there are any padding bytes, they aren’t being skipped. Apparently the code that looks at the surfaces doesn’t expect any padding bytes. So I modified this code to copy each line one by one, skipping the padding bytes. It fixed the issue! Not only did it fix the issue in VMware, but I discovered that VirtualBox with the graphics set to VMSVGA also had the same issue, and this fixed it in VirtualBox too.
With the patched version of xf86-video-vmware installed, RPiPlay began working properly in VMware:
I discovered I wasn’t done yet though. If I turned 3D graphics acceleration off in my virtual machine settings, the bug came back. In this case, xvinfo showed that there was a different device being used: VMware Overlay Video Engine. I looked closely at the code again, and figured out that I needed to make an equivalent change in vmwgfx_overlay.c. I’m slightly less confident about the change I did here, but I implemented the same type of fix and it seems to work. The reason I’m less confident is because this code is passing the info about the line pitch onto the next layer, which eventually becomes the kernel driver through DRM. I would expect the pitch to be handled properly either at that point, or by VMware’s virtual hardware. As far as I can tell, the kernel driver passes the line pitch info onto the virtual hardware. My experimental result is that it’s not paying attention to it the way I would expect. In vmwgfx_tex_video.c with 3D acceleration enabled, I knew the wrong data was being copied at the point where I patched it, so I’m pretty confident that the particular section of code I patched needed a change. In vmwgfx_overlay.c with 3D acceleration disabled, I’m not quite so sure what the intent of the existing logic is. It might depend on VMware’s proprietary internal code, which I obviously don’t have access to. At face value, it looks like VMware’s virtual hardware is being told that the line pitch is larger than the width, but it’s ignoring it. I could be completely off base though.
Anyway, this is the fun part about troubleshooting an issue like this. You have to dig into layers upon layers of libraries, drivers, tools, etc. in order to find the root cause of the problem, often familiarizing yourself with large projects that you know nothing about. It’s definitely an interesting challenge. Like I said, I’m not 100% sure that I’ve actually found the correct place for the fix to go in the case of the VMware Overlay Video Engine. Time will tell as my patch goes through review. For now, I’ve submitted the patch to the Xorg mailing list. We’ll see what happens from here. Anyway, this was a pretty educational process for me, and I hope someone out there enjoys reading this writeup!


Update: I reached out to some VMware people a few months ago after I discovered some new commits to the xf86-video-vmware project from late 2021:
https://gitlab.freedesktop.org/xorg/driver/xf86-video-vmware
Yesterday, an improved fix for the 3D acceleration half of the problem was merged:
https://gitlab.freedesktop.org/xorg/driver/xf86-video-vmware/-/commit/ff5637a14c52e6ec592592c88938104b087e925c
The non-3D-accelerated version of the problem is actually at a different level, and my patch is working around it at the wrong level, so it’s more complicated and we’ll have to rely on VMware to fix it.
Latest update: xf86-video-vmware version 13.4.0 was released with this fix about a week ago. Interestingly enough, looking at the announcement, the only reason it was even released was because the old release was failing to build against newer versions of the X server. It took almost two years for this fix to finally be released, but better late than never!