In the early- to mid-1990s, Apple produced their Macintosh Performa line of computers. These computers were meant for home users and typically came bundled with software such as ClarisWorks and Mario Teaches Typing, along with interactive tutorials teaching the basics of how to use the Mac OS. They were sold in places such as Wal-Mart and Sears.
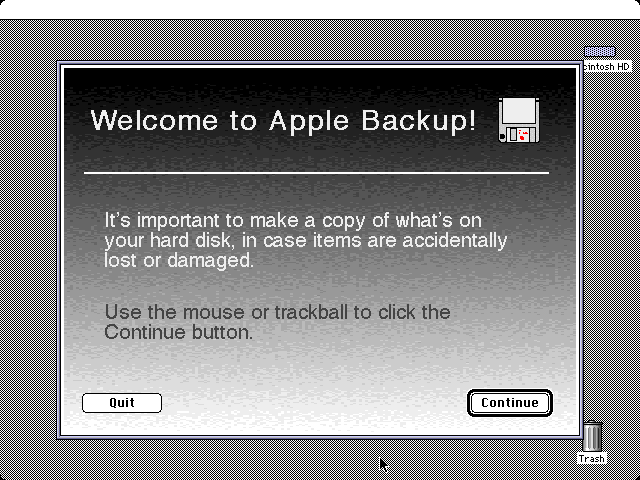
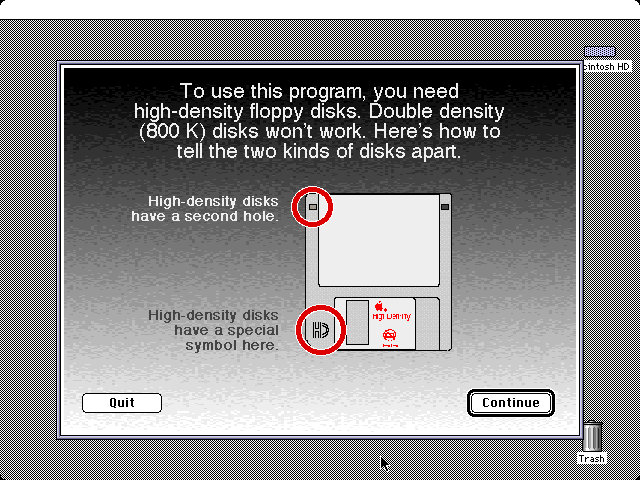
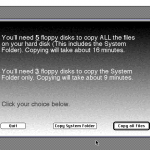
One interesting thing about these computers is that at least initially, they did not come with any software restore disks. If something bad happened and you wiped out your system software (which was easy enough to do — somehow I did it as a kid), you didn’t have a supplied set of disks (or a CD) for restoring the software. Instead, these computers came with software called Apple Backup, and you were supposed to back up your system onto 1.44 MB floppies when you first got it. When you ran Apple Backup, it would let you choose to back up either the full hard drive or just your system folder:
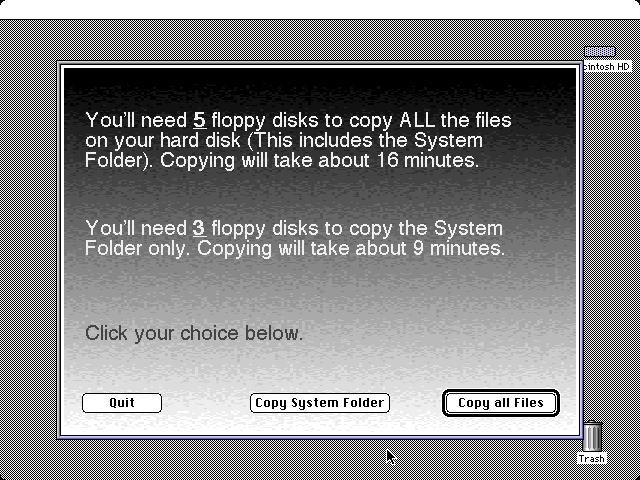
The number of disks needed here is small because I ran it on a simple barebones system to make this screenshot. With all of the bundled software on a stock Performa machine, it would have taken somewhere in the ballpark of 50 floppy disks to complete the backup of the full hard drive. Seriously, how many people would have bothered to buy all of the floppies that would have been necessary, and then actually taken the time to do it? Some people definitely did, and I’m impressed by the dedication. I know my family didn’t bother when I was growing up. It would have been more realistic to only back up user-created files, and then provide a system restore disk (or set of disks) to restore any original software, but the backup software didn’t work that way. Apple obviously learned from their mistake because they began bundling Performa computers with restore CDs at some point later on. (Note: To be completely fair to Apple, it was possible to obtain restore disks from them if you needed to restore your system and your Performa didn’t come with any.)
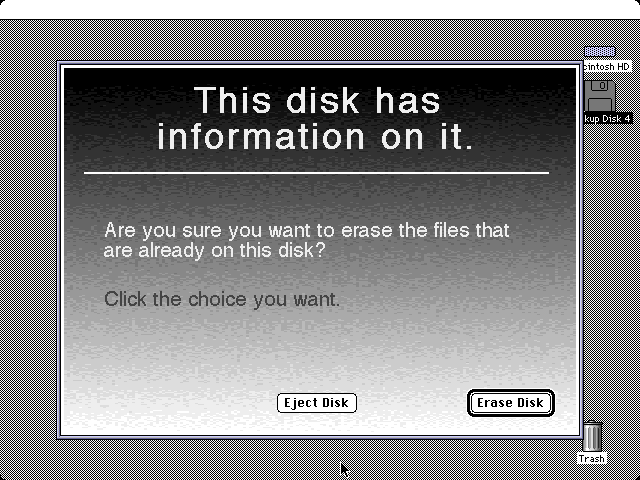
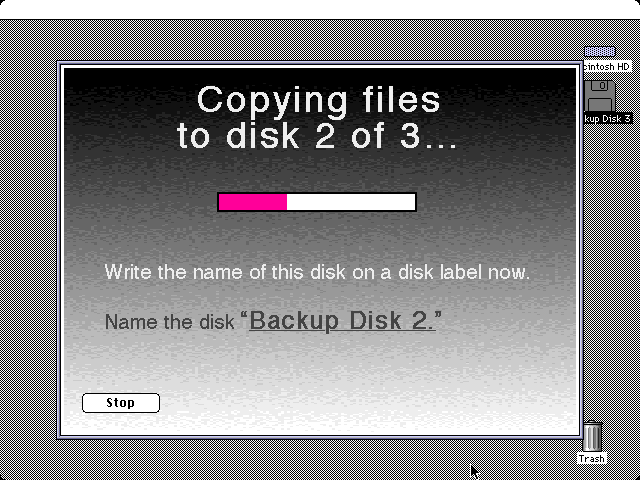
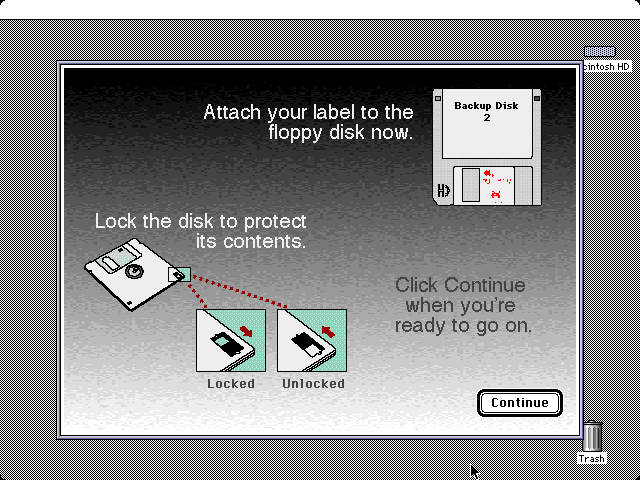
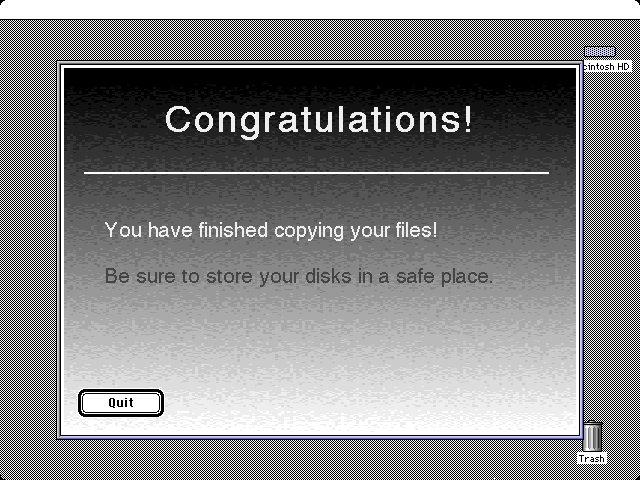
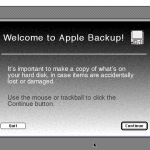
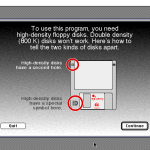
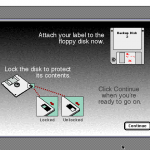
I ran the backup process on an old Mac for fun, and it guided me through the process of backing up the system. Click the thumbnails to see the full size, if you care:


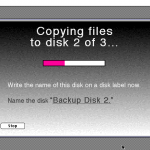

The resulting disks were normal Mac floppy disks, named “Backup Disk 1”, “Backup Disk 2”, and so on, each containing a single 1,414 KB file named Apple Backup Data.
To restore your data after a failure, you would boot up your Performa using the Utilities disk that came with the computer. The Utilities disk contained a barebones system folder along with disk formatting/repair utilities and a program called Apple Restore. You guessed it: Apple Restore was used to restore the system. You would run it and then insert your backup floppies one at a time to restore everything you backed up.
I looked at some of Apple’s later Performa restore CDs, and interestingly enough, they came with programs called “Restore All Software” and “Restore System Software”, each with a folder full of 1,414 KB files named “Data File 1”, “Data File 2”, and so on. So presumably Apple simply used Apple Backup to back up a stock system and stuck the resulting data files onto a CD to create the restore CD.
I decided that it might be useful to have Apple Backup’s file format documented in case someone out there ends up needing to restore files from their old backups (or wants to extract files from a factory restore CD). Although backup floppies from the 90s are probably going bad by now, I think it’s still cool to have the information out there. Anyway, I decided to reverse engineer Apple Backup and one of the factory CD restore programs (which does essentially the same thing as Apple Restore). I believe I have successfully reverse engineered the Apple Backup file format.
The rest of this blog posting contains the technical details about the format of the files that Apple Backup creates.
Overall layout of an Apple Backup data file
- Type code: ‘OBDa’ (CD restore files have type ‘OBDc’ instead, but are otherwise identical in format)
- Creator code: ‘OBBa’
- There is no resource fork, and the data fork content is summarized in the table below:
| Backup disk header |
| Boot blocks |
| File #1 header |
| File #1 full path |
| File #1 data fork data (if any) |
| File #1 resource fork data (if any) |
| Zero padding to next multiple of 0x200 bytes |
| File #2 header |
| File #2 full path |
| File #2 data fork data (if any) |
| File #2 resource fork data (if any) |
| Zero padding to next multiple of 0x200 bytes |
| File #3, 4, 5, … until data file is full |
Next, allow me to describe the content of the data fork in more detail:
Backup disk header format
All offsets and lengths are in bytes. All multi-byte quantities are in big-endian format as would be expected from a Mac file format.
| Offset |
Length |
Name |
Notes |
| 0x00 |
2 |
Version |
This spec is valid up to and including version 0x0104 |
| 0x02 |
4 |
Magic number |
‘CMWL’ – identifies this file as an Apple Backup file |
| 0x06 |
2 |
This disk number |
Value is between 1 and the number of disks. |
| 0x08 |
2 |
Total number of disks |
The total number of disks used for the backup. |
| 0x0A |
4 |
Backup start time |
In a Mac time format (seconds since January 1, 1904 00:00:00 local time) |
| 0x0E |
4 |
Backup start time |
Appears to always be a duplicate of the value above |
| 0x12 |
32 |
Hard drive name |
The name of the hard drive that was backed up. Stored as a Pascal-style Str31 (1 byte length, 31 bytes of string data) |
| 0x32 |
4 |
Total size of this file |
The total size of this restore file; value typically (always?) seen is 0x161800 |
| 0x36 |
4 |
Total size used in this file |
The number of bytes actually used in this restore file; value is typically 0x161800 except on last disk where it is probably going to be smaller. |
| 0x3A |
0x1C6 |
Unused |
Filled with zeros |
Total length: 0x200 bytes
Boot blocks
These appear to be standard Mac OS boot blocks, 0x400 bytes in size. Easily seen in a hex editor because it begins with LK, and soon thereafter has names: System, Finder, MacsBug, Disassembler, StartUpScreen, Finder, Clipboard. They are written to the hard drive by the restore program when the System Folder is blessed as it’s restored. For just extracting files, they are not really relevant. They begin at an offset of 0x200 from the start of the backup file, and end at an offset of 0x600 (where the first file header begins)
File/folder header format
Each file or folder starts out with a header. Again, all offsets and lengths are in bytes, and everything is big-endian. This header will always begin on a 0x200-byte boundary; padding bytes of zero are added to the end of the previous file’s data fork/resource fork data if needed. The first file header in a backup data file is always at 0x600, immediately after the boot blocks.
| Offset |
Length |
Name |
Notes |
| 0x00 |
2 |
Version |
This spec is valid up to and including version 0x0104 |
| 0x02 |
4 |
Magic number |
‘RLDW’ – identifies this as a file/folder header |
| 0x06 |
2 |
Disk number that contains first part of this file/folder |
This will match the current disk number, unless this file is split across multiple disks and this is the second, third, etc. part of the file. |
| 0x08 |
4 |
Backup start time |
Will be the same as the time in the backup disk header |
| 0x0C |
4 |
Offset of header |
The offset where this header begins in the disk (example: 0x00000600 in the first file header in every disk) |
| 0x10 |
32 |
File/folder name |
The name of this file or folder. Stored as a Pascal-style Str31 |
| 0x30 |
2 |
Which file part this is |
1, unless this is part of a file that has been split across multiple disks, in which case it will be 2, 3, etc. |
| 0x32 |
1 |
Folder flags |
Bit 7 = 1 if this is a folder, 0 if this is a file.
Bit 0 = 1 if this is the system folder and it needs to be blessed [selected as the current system folder] |
| 0x33 |
1 |
Validity flag |
Bit 0 = 1 if the following file info/attributes/dates are valid.
Bit 0 = 0 if this was a folder that is known to exist but its properties could not be read during the backup.
If a file’s properties cannot be read, the file is skipped during the backup process. So bit 0 = 0 could only happen with folders. |
| 0x34 |
16 |
FInfo/DInfo about this file/folder |
A standard Mac FInfo or DInfo struct containing info about this file or folder (from HFileInfo or DirInfo) |
| 0x44 |
16 |
FXInfo/DXInfo about this file/folder |
A standard Mac FXInfo or DXInfo struct containing info about this file or folder (from HFileInfo or DirInfo) |
| 0x54 |
1 |
File/folder attributes |
Standard ioFlAttrib byte from Mac Toolbox HFileInfo/DirInfo struct |
| 0x55 |
1 |
Unused |
|
| 0x56 |
4 |
Creation date |
Standard Mac time |
| 0x5A |
4 |
Modification date |
Standard Mac time |
| 0x5E |
4 |
Length of file’s data fork |
Total length of data fork of the full restored file including all split parts (zero for folders) |
| 0x62 |
4 |
Length of file’s resource fork |
Total length of resource fork of the full restored file including all split parts (zero for folders) |
| 0x66 |
4 |
Length of data fork provided by this disk |
The length of data fork data this disk is providing for this file |
| 0x6A |
4 |
Length of resource fork provided by this disk |
The length of resource fork data this disk is providing for this file |
| 0x6E |
2 |
Length of full file path |
Maximum length of 33*50 (enough space for 50 colon-delimited path elements, with many extra bytes left over).
This is the length of the string that immediately follows this header. |
Total length: 0x70 bytes. See Inside Macintosh: Files and the Mac Toolbox C headers named “Files.h” and “Finder.h” for more info on FInfo, DInfo, FXInfo, DXInfo, and ioFlAttrib. These items are where the type and creator code, invisible flag, and icon position in folder are stored, for example.
Full path format
The full path is just that: the full path to the folder or file, with the hard drive already being assumed. The components of the path are colon-delimited. The file being restored is the last component of the path. Example:
System Folder:Control Panels:Memory
(if the file being restored is the Memory control panel). It’s just printed as raw bytes, no null terminator or anything — it’s basically a Pascal string with a two-byte length, and the length is at the end of the file/folder header.
The actual file data
Immediately after the full path, the data fork bytes begin (number of bytes = “Length of data fork provided by this disk”), followed by resource fork bytes (number of bytes = “Length of resource fork provided by this disk”). It’s perfectly OK for the length of either (or both) of these to be zero. After that, there is padding (filled with “0” bytes) to the nearest 0x200 byte boundary, and then the next file/folder header begins.
When a file overflows the disk
If there is not enough space remaining on a disk for a complete file (this almost always happens at the end of each data file), the amount of file data that will fit on the disk is stored so that the full disk file size matches the size given in the disk header. Then the first file header on the next disk will be the same file’s header with the exception of the “Which file part this is” field, which will be incremented by one. It is possible for a file’s data to span several disks in this manner; the intermediate disks will only have one file header, followed by a repeat of the file path and data using up all available space on the disk.
For example: Let’s pretend you have 0x1000 bytes remaining on the current data file before its size reaches 1,414 KB. You’re ready to back up a file “Applications:TestApp” that that has a 512 KB data fork and a 128 KB resource fork. The file header will take up 0x70 of those bytes and the full path will take up 20 (0x14) of those bytes, for a total of 0x84 bytes — so there are 0xF7C (3,964) bytes left. So the file header is going to specify a data fork length in this disk of 3,964 bytes, and a resource fork length of 0 on this disk (the total lengths will be filled in as 512 KB and 128 KB though). Then the first 3,964 bytes of the data fork will be written to the file, giving it a total length of 1,414 KB. Then this disk will end. The first file header on the next disk will finish the remaining 520,324 data fork bytes and all of the 131,072 resource fork bytes, and then the next file’s header will begin on the nearest 0x200 byte boundary after that.
Conclusion
As you can see, the format is pretty simple. It’s just basically a disk header followed by a flat list of files until the end of the disk is reached. It should be possible to extract full and partial files from these backup archives even if the data files from some disks are missing. The partial files probably wouldn’t be very useful though.
The original Apple Restore utility didn’t let you pick and choose which files you wanted to restore — it just tried to restore them all, and it would ask you what to do if the file already existed and was newer than the backed up version. I see no reason why a utility couldn’t go through all of these files, give you a list of everything available, and let you selectively extract the files you want. It’s easy to detect what disk a particular backup data file came from because the disk header contains a field for what disk it belongs to.
If anyone’s interested in adding the ability to decode this format in an archive expander program, I would be happy to provide some sample data files. I may or may not decide to write a program to extract files from these backups, depending on how bored I get 🙂
Update 8/23/2022: GitHub user siddhartha77 created a new classic Mac utility called Apple Backup Extractor that can decode this file format. It can even decode what it can from an incomplete set of backup disks. If you’re looking for a way to recover data from these files, this is certainly the way to go!