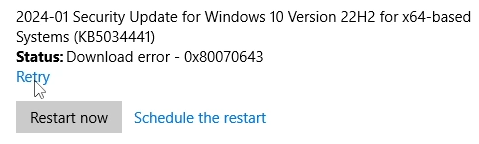
I was recently browsing around on YouTube and stumbled upon this video: Microsoft Confirms it will NOT Fix KB5034441 Error 0x80070643 on Windows 10. The video title got my attention so I figured I’d see what was going on. KB5034441 is a security update for the Windows Recovery Environment to fix a vulnerability that could allow bypassing BitLocker encryption, and some people have been noticing that the update fails to install.
I decided to check my Windows Update history, and sure enough, my computer was affected:

The truth is that I’m not using BitLocker, so the update doesn’t really matter for me. I hadn’t even noticed that it was failing repeatedly. Apparently it had also failed to install on January 11th. Knowing that my computer would continue over and over failing at installing this update bothered me though. It just felt wrong.
Microsoft has already stated they won’t be automatically fixing this issue in a future update. The underlying issue that causes this installation error is that the WinRE partition doesn’t have enough free space for the update. Why a security update needs a bunch of extra disk space, I do not know. And why they would not figure out a way to automatically work around this problem for an issue as serious as bypassing BitLocker, I also do not know. But I won’t pretend to be an expert on that — obviously they know best. They certainly must have their reasons. Resizing partitions can be dangerous — maybe that’s why — the benefit doesn’t outweigh the risk?
Helpfully, Microsoft did provide a couple of solutions fixing this issue: manual Command Prompt instructions, or a script you can run instead. Both of these solutions end up increasing the size of your WinRE partition by an additional 250 MB to make room for the update, by shrinking your system partition by that same amount.
I decided to try the manual instructions — I’m too paranoid to let a script run. Now, am I actually adding any value on top of the instructions that Microsoft already provided by writing this post? At least right now, I think so. You’ll see later. Additionally, I thought my post could be instructive because my setup is a little weirder than what you might see on a stock computer. When I opened diskmgmt.msc by typing that in the Start menu and clicking Create and format hard disk partitions, here’s what it looked like:

I have several internal drives. The first one isn’t actually my system disk. Also, I have two recovery partitions and my 100 MB EFI System Partition is near the end of the disk because my Windows install was originally MBR-based for a legacy boot and I converted it to GPT later. I think my computer is a good example for sharing how I followed Microsoft’s instructions to make my recovery partition bigger. Let’s walk step-by-step through the process together.
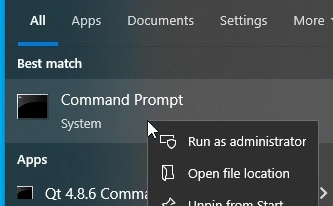
I started by opening an admin Command Prompt by typing “cmd” with the start menu up, right-clicking on it, and choosing Run as Administrator.
Next I ran “reagentc /info” to get the current WinRE status:
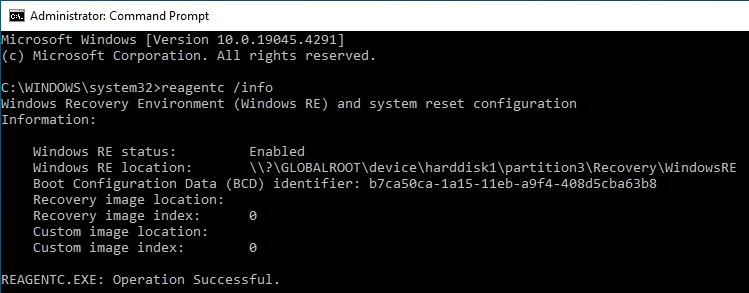
This told me two things: it confirmed that WinRE is enabled, and it let me know that the actual recovery partition is partition 3 of disk 1, which kind of makes sense. It’s the bigger 554 MB one directly after the system partition in my Disk Management screenshot above. So that 471 MB recovery partition at the very end of the drive is old. Maybe it’s the recovery partition I had before I converted to GPT?
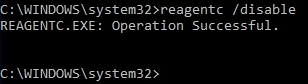
Microsoft’s steps now say to disable the WinRE because we will need to delete it temporarily in order to create a bigger one. To disable it, you type “reagentc /disable”.
With WinRE disabled, now I could go in and mess with partitions using the diskpart utility. I typed “diskpart” in that same admin Command Prompt window, and then followed the instructions, starting with typing “list disk” inside of it.
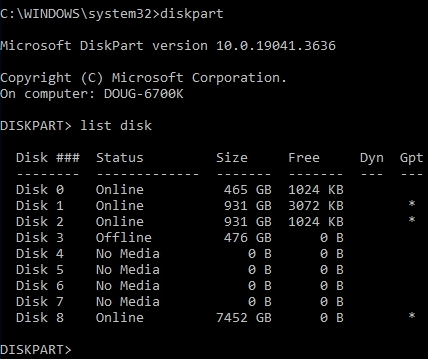
Yeah, I have a fair amount of disks here. I didn’t know which disk to use off the top of my head, but luckily the output from “reagentc /info” earlier told me that I would need Disk 1. That’s because the Windows RE location contained “harddisk1”. Also, the Disk Management GUI was useful for seeing which disk was which. I chose Disk 1 by typing “sel disk 1”. I feel like I should add that Microsoft’s instructions have a mistake:

There needs to be a space between “disk” and the disk index. The command is “sel disk 1”, not “sel disk1”. Someone with a lot of experience in diskpart would already know that, but I’m sure there are a lot of people out there who don’t. Hopefully someone who might be confused by that will stumble upon my post to resolve any confusion.
I selected Disk 1 and then ran the “list part” command to see the partitions:
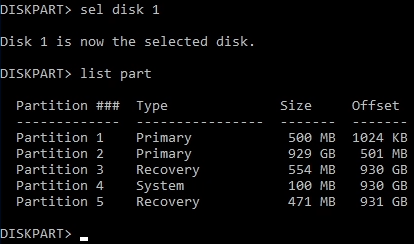
Like I said earlier, I have two recovery partitions. It was nice to have the output from reagentc confirming to me that my actual recovery partition was Partition 3. Just to be 100% clear, the reason I knew this was because after harddisk1 in the Windows RE location, the next path element was “partition3”.
Right now though, I’m looking for whatever partition is directly before the recovery partition. That’s the one I needed to shrink in order to make more space. I think in most cases, this is going to be the OS partition. On my computer, this is Partition 2 and it shows up as my C drive.
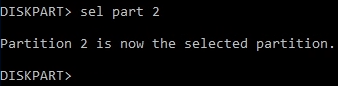
Following along with Microsoft’s instructions, I selected the OS partition with “sel part 2”. Once again, Microsoft’s instructions are omitting the space between part and 2, so I was sure to add a space.
Now for the scary part: I needed to shrink this partition by 250 MB so that I would have more room to increase the size of the WinRE partition after it. This is done with the following command given by Microsoft:
shrink desired=250 minimum=250
I might have been a little afraid of running that command if I didn’t have a backup available. Maybe that’s why Microsoft doesn’t want to fix this issue automatically. I’m not sure. If the system was powered down during this part of an update, it could spell disaster, at least I think. Unless Microsoft’s partition shrinking code is super duper safe. Maybe someone can chime in and let me know more about that. Anyway, I ran the command.
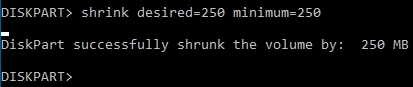
It took about 20 seconds to complete. I had left Disk Management open in the background, and it automatically updated itself and made it super obvious that the shrinking succeeded:

Now, how do we expand that recovery partition 250 MB to the left? Resizing to the left is a little complicated because you have to move the partition to the left first and then expand it to the right. I’m assuming something like GNU Parted could do it if you booted from a live Linux USB stick, but I stuck with Microsoft’s instructions.
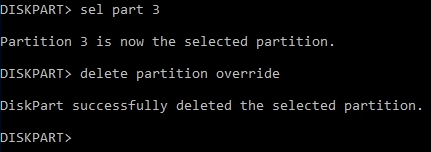
It turns out diskpart can’t move partitions like that. Microsoft instructs you to delete your recovery partition and make a new one filling up all the space instead. So because I had earlier determined my recovery partition was Partition 3, I typed “sel part 3” to choose the WinRE partition, and then deleted it. I know I’m beating a dead horse at this point, but the command is “sel part 3” and not “sel part3” as Microsoft says.
After selecting partition 3, and double checking to make sure it was indeed my recovery partition, I deleted it with “delete partition override”.
Again, Disk Management updated in the background to show I now had 805 MB of contiguous space after my C partition:

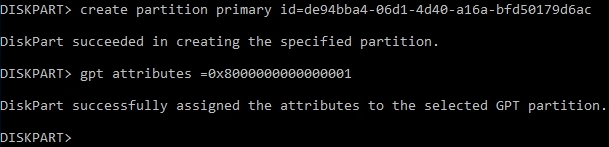
Here’s where the instructions differ based on whether you have an MBR disk or a GPT disk. In my case, my disk used to be MBR but I had already converted it to be GPT. As Microsoft says, you can verify this in the “list disk” output by looking for an asterisk next to your disk under the “Gpt” column. So I followed the GPT instructions and ran the following two commands:
create partition primary id=de94bba4-06d1-4d40-a16a-bfd50179d6ac

gpt attributes =0x8000000000000001
It might be best to copy and paste these commands one at a time (right-click in the command prompt to paste a command), but if you are going to type it out, there are 14 zeros between the 8 and the 1.
Disk Management’s GUI view of the drive looked great at this point too:

Nerdy details: the first command marks it as a recovery partition. The next command sets the partition attribute flags to mostly zero, but it sets bits 0 and 63. According to Wikipedia, bit 0 means it’s required for the computer to function properly and bit 63 means it shouldn’t have a drive letter assigned.
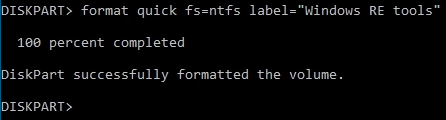
Next, Microsoft’s instructions told me to format the newly-created partition with the following command:
format quick fs=ntfs label="Windows RE tools"
I feel like I should mention that Microsoft’s page is showing the quotes around Windows RE tools as both being “smart” closing quotes, at least when copying the command out of Chrome and pasting into Notepad. It looks like Command Prompt will correctly convert them to normal quotes when you paste it though. I was scared and typed the command by hand instead, especially after observing Microsoft’s mistakes with the missing spaces earlier.
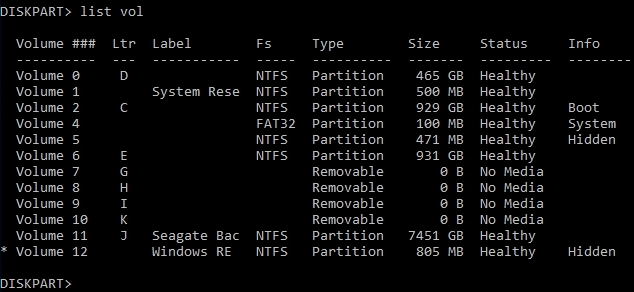
I was on the home stretch at this point. I ran “list vol” as they suggested and it showed up at the bottom of the list.
The final step was to exit out of diskpart, re-enable WinRE with “reagentc /enable”, and then re-check with “reagentc /info” to make sure it picked the correct recovery partition.
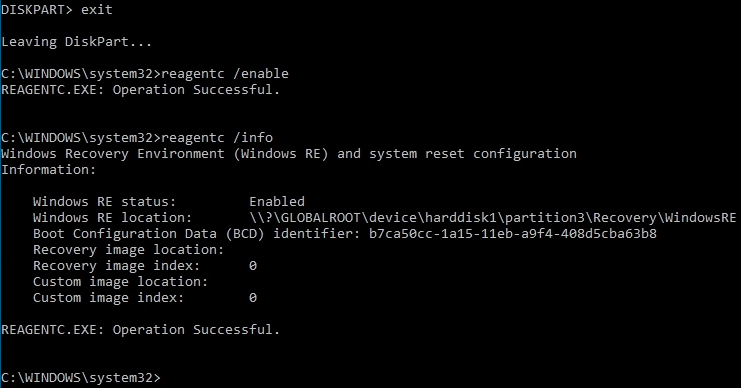
The output of all of those commands looked great. I was slightly worried that it would pick my old recovery partition at the end of the disk instead, but it seemed to know it should pick the new empty Partition 3 that was right after the C partition.
I probably should have rebooted first, but I jumped directly into Windows Update and told it to retry installing the update.
Sure enough, it seemed to install with no problems. I crossed my fingers, rebooted, and went back into Windows Update’s history. All is well now.

I do feel kind of funny essentially just repeating Microsoft’s instructions verbatim on my blog, but I thought the screenshots of the process would be useful for people, and also it’s pretty bad that their instructions are missing spaces. Anybody know how to get ahold of the right folks to fix the spacing issues on Microsoft’s instructions? I submitted feedback on the page at least…
I’m still not sure how I feel about the overall problem here. If it wasn’t a security issue I would care a lot less about it, but it seems bad to me that a security issue allowing a bypass of BitLocker potentially won’t install correctly on a lot of users’ machines. On the other hand, the vulnerability does require physical access so I guess it’s not as dire as other potential security issues out there.
Do any other Windows updates slightly shrink the C drive to make room for another partition? If so, I feel like Microsoft should have done the same thing with this update. Even if they don’t want to destroy the existing WinRE partition contents in order to make more room, couldn’t they dump it to a temporary file on the system drive, delete the partition, make a new bigger one, and then restore the contents of the dump? Anything seems better than just letting the update sit in limbo forever. There must be more to this that I don’t understand. I know from my experience as a software developer that sometimes things which sound easy end up being not so easy in reality.
I hope this post is useful for someone out there!


I guess as one data point for a negative effect of changing your partition layout, it forced my incremental backups with Macrium Reflect to start over. So I guess messing with the partition layout can have extra side effects on stuff like that. Maybe that’s one reason Microsoft chose to not do it automatically…
Another note on this: I just noticed I have a Windows 10 VM that was also affected by the problem. The shrink failed — it gave me this error:
The specified shrink size is too big and will cause the volume to be smaller than the minimum volume size.
What this really means is “there’s a file that can’t be moved that is too close to the end of the partition”. In my case it was the pagefile, so I had to disable it temporarily following these instructions:
https://superuser.com/a/1060508
That’s another data point for why Microsoft couldn’t just do the volume shrink for everyone automatically.
thanks for the walkthru! have used disk part randomly for 20+ years, and finally with your explanation it all made sense.. comparing Disk Mgt gui with reagentc and Disk part listings was invaluable as I have 5 drives with multiple parts/vol. got it done 🙂
I’m glad it helped you, Angeline!
Thanks for taking the effort to so thoroughly discuss, explain, and show clearly how to handle this thorny problem. I do have this update problem with an i5 Dell “Latitude” E5450 laptop. Could I please ask you to comment, because when I look at the computer management screen, and I have done the correct CMD queries to identify the recovery partition (hardisk0\partition1), it says I have 499MB of capacity, and says 499 MB Free Space, and the next column says % Free is 100%. It also says “Layout” is “simple”, and that Type is “Basic”. So I am puzzled, if the MS specified min requirement is 250 MB, and I am certainly well above that minimum, I should be ok, but yet this Win10 laptop, repeatedly fails this security KB5034441 download. Even quirkier, I also have another Dell, an i7 Inspiron 5770, and it did not fail on this security update. But by contrast, it shows 650 MB capacity, 650 MB free, and also says 100% free. So I am questioning how to proceed with the little i5 Dell with 499 MB, like is MS’s number of 250 MB not a good number? Should I try the procedure you noted, and if I did, how would I determine what numbers to put in to enlarge it by. I would love to hear how you would go about handling the problem on the i5 Dell, esp. in light of the other one (the i7), just breezed thru. So baffled as to what to think about doing next. Many thanks in advance!
Hi Chuck,
It seems as though Disk Management doesn’t properly list the free space on recovery partitions. The recovery partition on all of my computers also shows up as 100% free even though it’s clearly not empty. I would probably chalk it up to a glitch with how free space is being reported by Disk Management.
I think the existing recovery partition being larger on the i7 Dell explains why the update succeeded on that machine. It also succeeded without needing any intervention on my Acer laptop that had a 1 GB recovery partition, but all the other computers I’ve tested have run into this problem. They had smaller recovery partitions around 500 MB or so. Microsoft’s instructions help you increase the recovery partition’s size by another 250 MB to ensure there will be room to install the update. Now mine is 805 MB for example. It used to be 554. I guess that’s really an increase of 251 MB — I would guess that’s due to rounding error during the resize or something.
Are you sure that your recovery partition is partition 1? I would definitely double check that with the “reagentc /info” command. Usually I’ve noticed that the recovery partition would be somewhere after the main C partition, not before it. My partition 1 is 500 MB, but it’s the “System Reserved” partition and not the recovery partition.
The reason I bring that up is because if your recovery partition is really partition 1, it’s going to be impossible to easily fix the issue. You wouldn’t be able to grow it without moving other partitions around — but moving partitions is difficult. You can grow and shrink a partition, but you can’t move a partition’s starting location left or right using Microsoft’s built-in tools, at least not while you’re booted into Windows anyway. In order to make partition 1 bigger, you would have to shrink the partition after it, and then move its starting point to the right to make room for partition 1 to grow. Moving the starting location of a partition is difficult to do and requires special software. It also takes a long time and is more likely to cause you to lose data. Microsoft’s instructions typically assume the recovery partition is directly after the main C partition. With that configuration, you can shrink the C partition that is before it to make more room, then delete the existing recovery partition (because you can’t grow it to the left), and finally re-create a new recovery partition in the entire freed up space like in my example.
I hope this info is useful!
Hi Doug and thanks, yes your response was extremely useful and clarifies feasibility of what to do next. Yes I am very sure it’s partition 1, as I did use “reagentc /info” command, which showed it clearly, … plus in the computer management screen, the very first line says “(Disk 0 partition 1)”, and then in the “status” column to the right, it says “Healthy (Recovery Partition)”. Then right below that, the next line says “(Disk 0 partition 2)”, with a status of “Healthy (EFI System Partition)”. Then below that are 3 entries for the ordinary Drives A, B, C. But you are quite right, as when I look at the next part of the table, below the preceding, for “Disk 0”, the order of the entries are, left to right, 499 MB Healthy (Recovery Partition ; 100 MB Healthy (EFI Partition) ; then C-Drive ; then B-Drive ; then A-Drive. So as you said it looks like to do anything, all the action would first hit the EFI partition, and then C-Drive. So I guess if one was very bold and skilled, I could bit e into the C-drive, but I see the risks you cite. Just for giggles, the i7 Dell that had breezed thru the update, no problem, has the recovery partition AFTER the C, A, and B drives. But that machine is ok. so anyway, it seems with seeing all this as you explained, the risks are quite high to change the i5 that fails. I do have all its data fully backed up, and it is not my primary workhorse laptop, and if I lost “everything”, it would be quite recoverable, just a bit more work. I assume then the fix would then to be to do a full reinstall of win10 (?), that is … if control could be achieved after a failed fix attempt, i.e. be bootable enough to re-partition and install win10. I was entertaining a possible reinstall of Win 10 anyway, so if I was willing to do that anyway, could I then wrestle partition control and make the update work? A lot of work for sure,, vs. and I wonder just how vulnerable the i5 Dell would be without the update. It gets used for various info searches, seeing email, hearing videos and audios, and other non critical viewing uses. But not any financial transactions. So then perhaps the non updated hacker invasion risk is minimal (?) though I do like to be certain that all my PCs are always clean as files may get copied back and forth among them, so I want them all to be trustworthy. But I definitely get the feeling from you it wouldn’t be easy to mess with these Recv partitions. Any further comments and enlightenments from you would be much appreciated, especially as far as if the worst that could happen would be to do a full win10 reinstall. I’ve done that before on several PCs, including partitioning (i.e. my A, B, C drives, but those are child’s play by comparison I guess), when problems went south and unfixable. Such fun ? !!
Hello Chuck,
Ahh, that is very interesting! I’ve never seen a partition layout like that before. I wonder if Dell arranged the partitions like that from the factory. Yes, this puts you in a bit of a pickle. It’s another great example of why Microsoft hasn’t been able to automatically fix this for everyone. Thanks for sharing that strange layout! I’m not sure the effort required to fix this in your case is really worth it, to be honest. It only matters if you are using BitLocker. If you aren’t using BitLocker, then this security update doesn’t really matter in the first place and I wouldn’t worry about it. It didn’t matter for me, but the OCD in me just wanted the update to appear as installed so it wouldn’t nag me anymore! Haha.
I’m not sure if a reinstall would correctly create a larger recovery partition or if it would just make another 500 MB one that wouldn’t be big enough. I do have one other idea on your i5 machine. What if you shrink the C drive by 750 MB? This wouldn’t free up any space before it, but it would free up 750 MB of space after it. Then you could make a new 750 MB recovery partition after the C drive and before the B drive. Finally, you could delete your original recovery partition at the start of the disk. This would ensure that “reagentc /enable” would be guaranteed to find the new 750 MB one. This would leave you with a little bit of free unused space at the beginning of the disk, and you would lose 750 MB of capacity on the C drive rather than 250 MB like most people who run these instructions, but it would allow you to create a 750 MB recovery partition. I don’t know if this would interfere with any of Dell’s original supplied recovery software though.
Again though, I don’t want to suggest something that’s going to create more problems for you than it’s worth. You might be better off just ignoring the update altogether because the risk does seem minimal. My understanding is the security update is about preventing someone with physical access to your computer from being able to bypass the BitLocker encryption. If you’re the only one with physical access to the computer, or you’re not using BitLocker, the security update is completely irrelevant anyway. That’s probably why Microsoft isn’t being super vigilant about fixing this for everyone.
Hi Doug …. Many thanks for your comments/ suggestions, as was also wondering if I should just let it be, but what you said makes me feel comfortable with that now. Alas I think we both just want it to be fundamentally “right”, i.e., the OCD in both of us. Since you wondered about the Dell difference, there’s an additional piece of info about that. I bought the subject i5 Dell “used”, i.e., “refurbished” from a reputable reseller. So when I rec’d it, it obviously had already been totally wiped, (i.e., standard business procedure for refurbs), and came with a fresh new OS reinstalled. So then the Dell formatting and “Dell-ware” would be gone, and they would not have worried about duplicating the original setup. Hence that is probably why of the two Dells look different in the structure of the partition setup, and making the i5 trickier to re-partition. While on that topic, the other Dell, (the i7 with more space and no issue), I bought right from Dell, and its OS is still intact as rec’d, except that I disabled and uninstalled the Dell bloat-ware. Also, as would be expected, when I look in the i5’s Task Manager, there’s not a lick of any Dell bloatware, and of course no reason for similar partitioning schemes. So interference with anything Dell on the i5 is not an issue, and I could do the re-partitioning plan you noted (though I recognize as you noted earlier, it could be a handful to do, with special needed software, and go badly). And hence may not be worth doing. I say that because of other points I’m really glad you highlighted. No, I do not use Bitlocker, and am glad to know that if I don’t use it, I’m not at risk. Plus on top of that, no other person has physical access to it, so that risk is not there. Nobody else, just me, myself, and I. So indeed knowing all these factors are really helpful, and much appreciated in nailing down limits of risk, which now show clearly as just about zero. Yup, I could mess with it, but all that technical risk vs. almost no practical hacker risk, means as you said, may be best is to just leave it as is. Even if the OCD in us nags at us! I can now feel ok with knowing in full, the real tech nature of what is wrong, know it won’t matter for how I use it, and know it’s ok to ignore the update failure. And indeed, as you said, maybe that’s why MS chose not to bother with it further, but they could have said something as such so users could feel more confident instead of being left wondering, worrying, and trying to diagnose. Maybe they said as much somewhere, if one plowed thru reams of MS info, and inferred the conclusions, but you know, it’s not how they write.
One other question for tech interest sake, I gather that if a total reinstall had to be done, it would automatically wipe the recovery partition et al … but as the installer, I would not necessarily have control over allocating that space ? I assume it would just do it according to certain pre-set defaults ? Or would a re-install not be that smart and just keep what’s there? So if a Recovery partition fix/ re-do (as you detailed) went badly, a win10 full re-install would then not necessarily fix it? Or is a win10 reinstall smart enough to wipe it all and make it fresh? Hey many thanks again!
Hey Chuck,
Gotcha — buying it from a reseller probably explains the difference in partitioning you observed. It all makes sense now. Glad to know someone else relates to me being bothered about that nagging update error!
As for your question about doing a total reinstall, all I know is when I’ve done a Windows 10 installation from scratch, it has automatically created the recovery partition for me. I was never given a choice for the recovery partition size, so it makes me think there are indeed some pre-set defaults that don’t make it big enough. I don’t know if they’ve increased those defaults with modern Windows 10 installation media to make it bigger than 500 MB or what.
I think if you don’t wipe out your existing partition layout when doing the installation, it’ll just try to reuse the partition layout you already have. So if you do decide to reinstall, it might be wise to completely wipe the drive from scratch. At the very least, if you did it that way, I would assume Windows would decide to put the recovery partition toward the end of the drive. That would at least enable you to do the normal partition resizing method described in my post if it wasn’t big enough and the update was still failing.
As a novice at this level of disk management I stopped when I reached the inability to move the recovery partition left after resizing the system partition with diskpart. The whole process to accomplish the resize described above has to many places where an error would create quite a problem, or just not do the required step with no explanation what was in error. I agree I have an OCD issue as noted above since my Dell i7 system can not be updated to run win11. (which I don’t want anyway)
Awesome, After six months of errors, I followed your instructions on two computers and both worked perfectly first time.
Many thanks for all your help, and also the two add’l commenters. Indeed, we all would like to get it to be right, but stuff doesn’t always lend itself to that end. Yet it will still be ok. It’s good to know just what the lay of the land would be if I ever were to wipe it, and reinstall all over (i.e. such as if some other future corruption were to befall it, despite my efforts to guard against that). But considering all the risks noted, vs. the low risk since I don’t use BitLocker and I am the only one who uses it, it’s clear the best choice right now is to let well enough alone. Also contributing to this is that the days for win10 support are numbered, it’s not Win11 compatible, and I have no plans to stop using the i5, once Win10 turns unsupported. It will just keep rolling with non-critical use, until whenever/ whatever! Moocho thanks !
Bruce, if you got to the point that you needed to resize the recovery partition to the left, it sounds like you were well on your way to getting it done. The remaining instructions just delete the entire recovery partition and re-create it, which effectively resizes it to fill all the space to the left too. But yeah…it’s likely not a huge deal to ignore this one.
Glad this helped you John!
I’m thrilled that this post and comment discussion was useful for you Chuck! This is why I take the time to write this stuff. Thanks for stopping by!
I too am very appreciative for all the exchange we shared, esp with MS is as it is, often insufficient msg’ing, (but a bit better than it was a number of years ago), and not always easy to connect the dots of their info without being an over the top, super guru.
Yeah, the automated script did do it, and yes, I get the apprehension with the automated script route. In my case, I did have to restart the system as it still failed. Once I did that, it installed within seconds as it was apparently already downloaded.
Doug, I am working on afriends Surface system that is suffering from the same Windows 10 KB5034441 update installation error 0x80070643. She has a single disk 120gb. Part 1 is 350mb Healthy Recovery, Part 2 200mb Healthy (efi), Part 5 806mb Healthy Recovery (created following your instructions) doing the shrink and joining from previous part 5 that reagent info ID’d) , Part 6 5.5gb Healthy Recovery (I suspect this is a MS OS recovery space) and finally Windows C: vol of 112GB.
In her reagent /info I am now stuck at pointing to part 1. Also, in a feable attempt to expand reagent into the O/S partition I have somehow have the Recovery Image Location pointng to partition 6.
Any suggestion on how to clear the recovery image locationb and get reagent pointind to part 5.
Thanks John
Hi John,
I’m not totally sure what to do in that case. It just seemed to automatically pick the correct partition for me when I did it. Maybe reagentc /disable, then delete the old 350 MB recovery partition #1, and then reagentc /enable? I wonder if that would nudge it toward choosing your newer partition #5 instead.
Doug, thanks I did that earlier thinking the deletion might work. Then I got the “windows RE Image was not found” and winre.wim is missing. I am working through a youtube video on restoring the winre.wim from a source ISO. Lost of fun.