Long story short: Dell recently released a bad BIOS update (3.9.0) for the Inspiron 3650 that seemingly bricked people’s computers. Luckily somebody discovered an easy fix you can do yourself by changing a jumper on the motherboard. If you’re interested in hearing how I fixed it in a much more convoluted way before this info about the jumper was available, keep on reading.
My cousin recently asked for help with his Dell Inspiron 3650. It’s his computer he uses for his business. It had asked him to install updates, which he did, and then the computer stopped working. It would turn on, you would hear the fan come on, and then 5 seconds later it would turn itself off. After a second, it would turn itself back on and the process would repeat over and over again. The computer never booted.
This computer is out of warranty, and has been for about 2 years. There was seemingly no way to contact Dell for help, and I don’t think they would have been much help anyway.
I stopped by his office after work. I was kind of skeptical that an update would cause this type of symptom, but sure enough, his computer wouldn’t boot. I couldn’t even get into the BIOS. It was like the computer was completely hosed. He had no idea what update he had installed. He only knew that he had just installed updates and allowed the update to reboot the computer when it was complete. When I pressed for more details about the update he installed, he was pretty sure it was a Dell update and not a Windows update. My initial guess was “the update was just a coincidence, and the real problem is probably a dying power supply.”
His power supply looked okay though. With my multimeter I checked all the voltages and they all seemed okay when the computer was turned on. Unfortunately, Dell uses a weird 8-pin connector for the power supply instead of the standard 24-pin ATX connector. I know that good voltages don’t necessarily mean the power supply is good, but I went ahead and moved onto other ideas. If Dell used a standard ATX connector I would have tried a different power supply just to rule it out. But with this computer I couldn’t do that.
I noticed on Dell’s website that BIOS version 3.9.0 had been released the same month (June 2019). At this point I started to get suspicious that maybe an update really did screw up his computer. The symptom my cousin’s computer was showing seemed like the BIOS was hosed. I went ahead and moved forward with the assumption that his BIOS was messed up.
Dell has instructions for recovering a broken BIOS on their website. You’re supposed to format a flash drive as FAT32, copy the BIOS update .exe file onto the drive, and rename it to BIOS_IMG.rcv. Then, you boot the computer while holding down CTRL+ESC, which should cause it to try to do recovery from the flash drive. I tried this with various BIOS versions available on Dell’s website, but they didn’t work. The computer would stay on without rebooting, so I knew CTRL+ESC was working, but the power light would flash orange/amber 3 times and white 4 times. Some Googling indicated this is an error code that means the recovery image was found, but it’s invalid. Those codes are for a different model, but it seems like it probably means the same thing on this model.
It’s possible I could have gotten this to work. Someone on Reddit later discovered that you have to use a different file (generated from the exe) for recovery on some models — something that Dell doesn’t document anywhere. Maybe that would have worked too. I’m not sure. I thought I tried that using that file at one point myself without success, but I may have done something wrong.
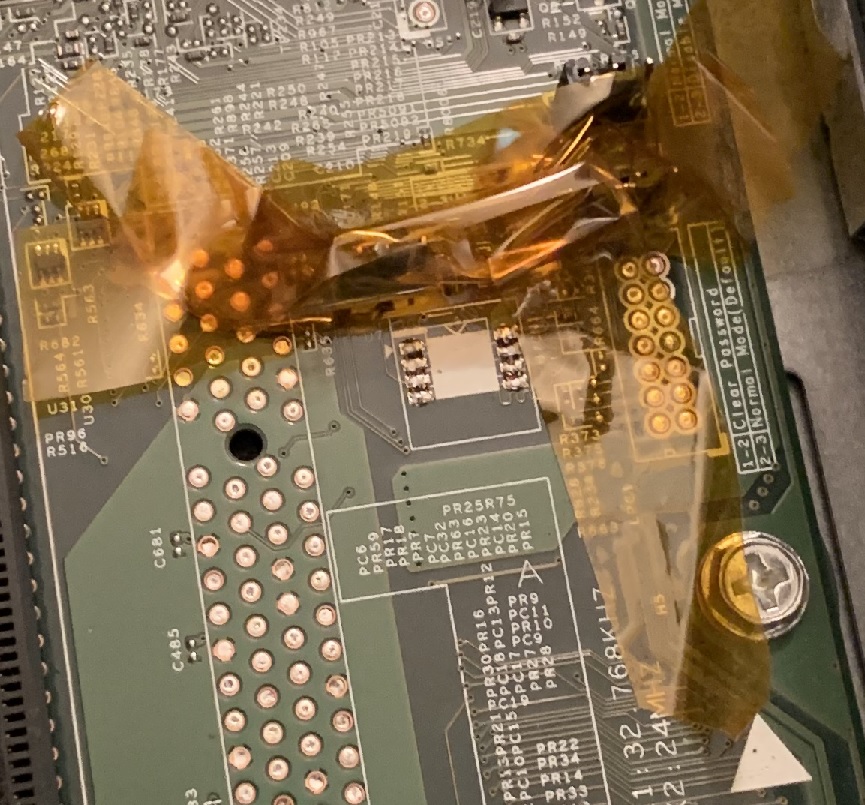
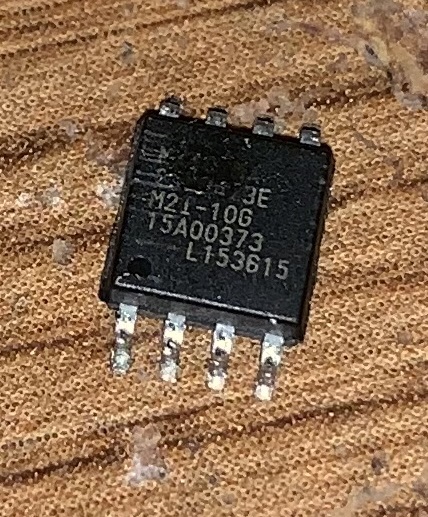
At this point, it was 9 PM and I felt like I was going to have to order a new motherboard for my cousin the next day, so I didn’t feel scared to play with his broken motherboard a bit. I had nothing to lose. I desoldered the BIOS flash chip from the motherboard with my hot air station. I took the battery out while I did this because it’s close to the chip and heating up a battery isn’t a good idea. I covered nearby components with Kapton tape to try to protect them from the heat.
I read the contents of the chip using a cheapo generic CH341A programmer I had laying around (be careful with these; they are often incorrectly wired to output 5V instead of 3.3V for the SPI signals!). Anyway, this resulted in an 8 MB file containing the readback. I read it back twice just to be extra sure I got a good dump. I also figured out how to extract the actual BIOS image from Dell’s updater .exe file by running it with the /writeromfile option, which resulted in a 6 MB file. Hmm…what about the extra 2 MB?
I did some looking at the BIOS chip readback and it became apparent that the first 2 MB of the chip contained some other stuff (probably related to Intel’s Management Engine) and the last 6 MB of the chip contained the actual BIOS image. So I used a hex editor (my favorite is HxD) to replace the last 6 MB of my readback with the content of the ROM dump I got from the /writeromfile option, and wrote it back to the chip using my CH341A programmer and flashrom.
I soldered the chip back onto the motherboard. It didn’t work the first time because I did a terrible soldering job when I put it back in, but after I cleaned up my soldering, the computer booted! It now prints the message “(A7) Me FW Downgrade – Request MeSpiLock Failed” for a brief moment when the computer powers on, but it works fine otherwise. Just a minor annoyance. I have no idea why reflashing 3.9.0 that way worked fine even though the original update process didn’t.
Note: Reflashing the BIOS the way I did is probably not smart, at least on a Dell computer. I noticed that it wiped out the factory-programmed Dell service tag info, and who knows what other factory info might have been lost. I was able to re-enter the service tag in the BIOS, but other info might have been wiped. But I don’t care! The computer works!
I’d highly recommend not fixing this problem the way I did it. As I linked at the top of the post, someone discovered that if you change the MECLR1 jumper on the motherboard from 1-2 to 2-3, it also allows the computer to boot with the broken BIOS. That’s a much easier and safer fix than what I did. If my cousin runs into future problems because of the way I fixed his computer, I can always reprogram his BIOS chip with the original broken contents and use the jumper fix instead.
I noticed that someone else on Reddit had experienced the exact same problem, at which point I was pretty confident that this whole thing was Dell’s fault. I had a bit of a tough time getting in contact with Dell to notify them that they had a broken BIOS update. Because the warranty is expired, they didn’t want to talk to me. The DellCares Twitter account was useless. I ended up sending an email to Michael Dell’s email address, which got me in contact with Dell’s Advanced Resolution Group. I noticed the next day that BIOS version 3.9.0 had been pulled from their website. I don’t know if my report had anything to do with that, but at least the update is gone now.
Over the next few days, I noticed more and more reports on Reddit and Dell’s forums of the problem, which is also where I discovered someone’s clever solution of changing the jumper to disable Intel’s Management Engine. Good stuff. I’m glad there is an easier fix that doesn’t involve soldering!
I thought my solution made for a fairly interesting story, so I decided to share it anyway. Hope this info is useful for someone out there.


Great read! Desoldering the BIOS chip was a brave move but it made a great blog post. Did you melt the package of the IC a little when you were removing it?
Thanks! Yeah, I knew I had nothing to lose at that point so why not? The picture makes it look like I melted the chip a bit, but I don’t believe I melted anything. I think it’s some kind of residue. I might have put some flux on to try to help with desoldering. I was so tired when I was doing the desoldering that I can’t remember if I did or not. I do know that when I was all done I cleaned everything with 99% isopropyl alcohol and it looked pretty good.
Wow, you are a super sleuth – nice work!
How did you figure out that the first 2 MB was IME and the last 6 MB was the actual BIOS image? I wouldn’t have had any idea how to interpret that data, except perhaps dumping it all into a disassembler.
Thanks, Steve! BIOS images like that usually have some kind of identifying header, or at least some data that looks similar between different BIOS versions. In the case of this Dell BIOS, the 6 MB BIOS image’s first 4 bytes were “$TAG”. There was another $TAG 32 KB into the file too. The start of the chip dump wasn’t $TAG, so I knew the BIOS didn’t go at the start. At that point, my next best guess was the 6 MB was stored at the end of the chip, so I looked at the data 2 MB into the start of the chip dump, and sure enough, I spotted “$TAG”. I scrolled through a little bit further just to make sure that everything seemed to be similar, and saw the second $TAG 32 KB later. At that point I was confident I knew where to put the BIOS image.
Moral of the story.. if you don’t get support or support have expired . Send email complain directly to CEO ! . I get it. Thank you. 😀
Ha…but the point wasn’t that I wanted out-of-warranty support, the point was that I wanted Dell to be aware that they were deploying a bad update to lots of out-of-warranty computers. I was trying to do them a favor 🙂
[…] directly onto the motherboard through the SOIC clip, assuming the BIOS chip is a SOIC chip. I’ve also used hot air to remove a BIOS chip for programming in the past, but I wanted to avoid doing that if I didn’t need […]