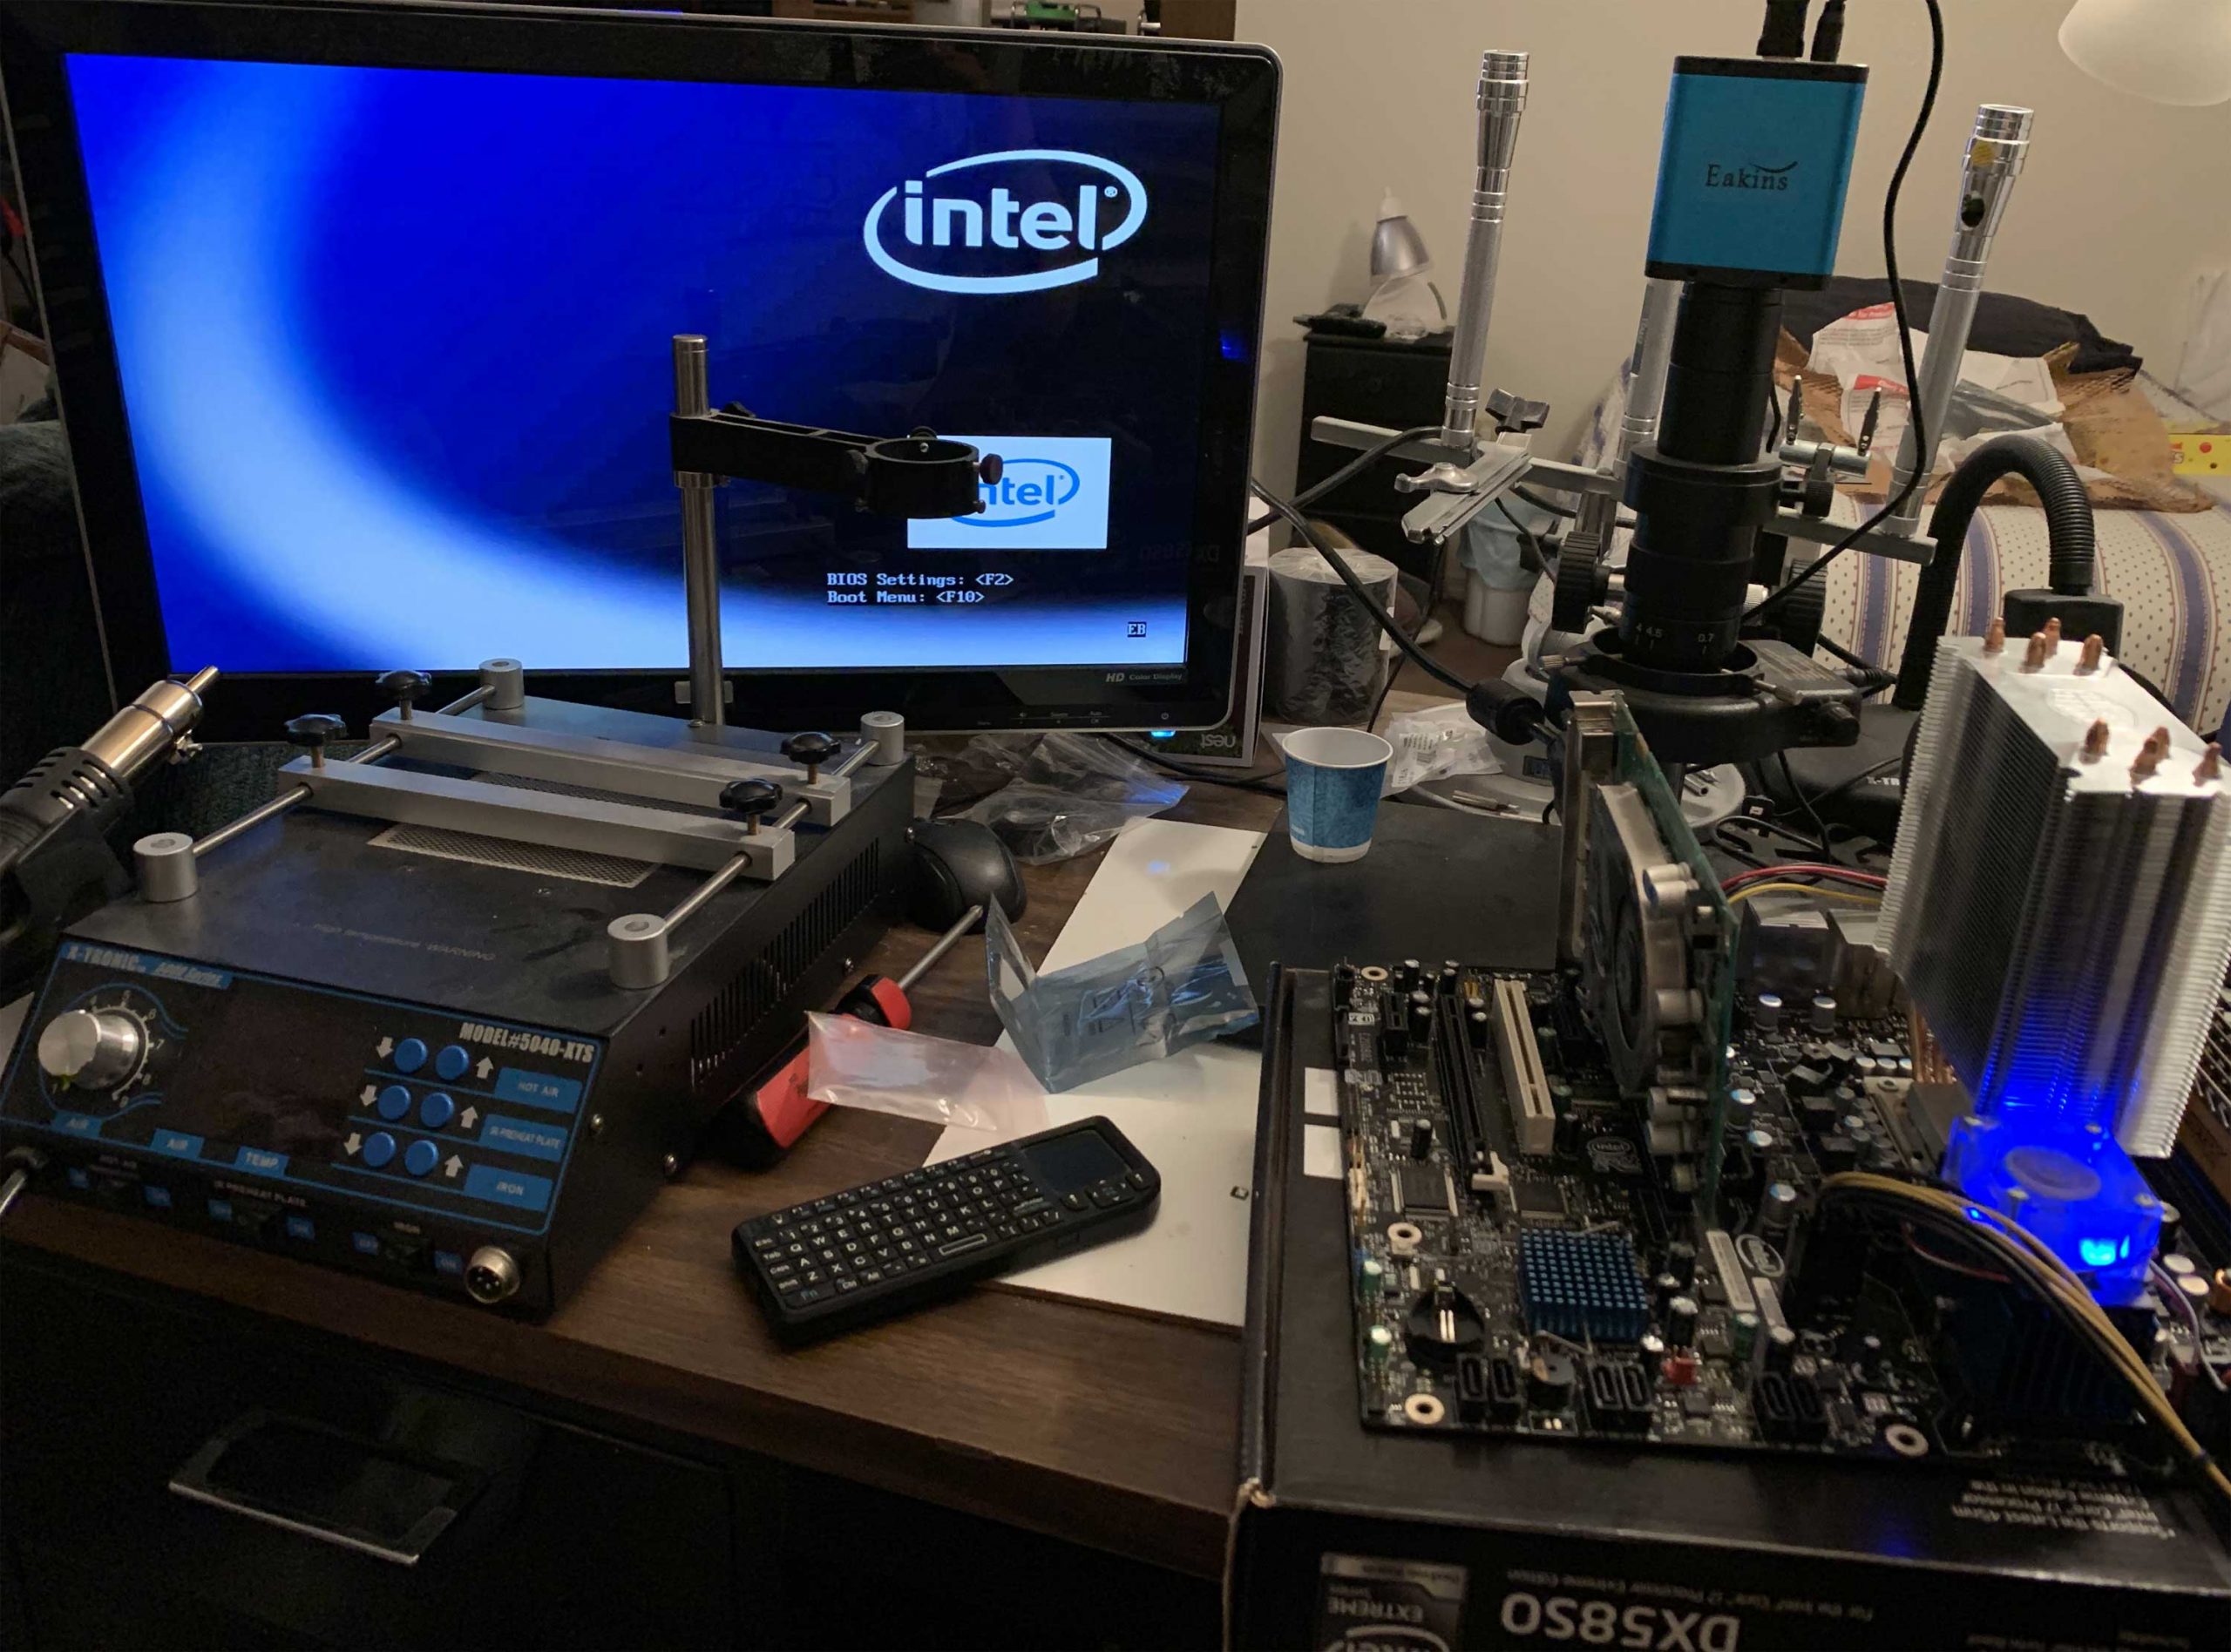
Last week, my main Linux computer died. It has an ancient Intel DX58SO motherboard from 2009 with an LGA 1366 CPU socket. A couple of years ago, I replaced its original Core i7-920 processor with a Core i7-980 from eBay. Considering its age, it’s actually a pretty powerful computer: six 3.33 GHz cores.
Anyway, here’s what happened. I was working, and just as I was about to join a meeting, I heard all of the fans in the computer stop spinning. The power LED remained on, but other than that, the machine looked like it was powered off. I tried power cycling it, but it was completely dead. After power cycling, the power LED wouldn’t turn on either.
My mind naturally jumped to the assumption that the power supply had probably died, but that wasn’t it. I tried a different power supply and the same problem was there. I also noticed that when I pressed the power button, the CPU and chipset fans would move for about a quarter of a second and then shut off. Not that I needed any more proof at this point, but my ATX power supply tester also told me the power supply seemed to be working.
I isolated the problem to my motherboard by removing all of my PCIe cards and RAM, and swapping in my old i7-920 processor. The problem remained. This killed any hopes of a quick and easy fix, so I took the SSD out, put it in my main Windows computer, and created a VMware virtual machine that booted from it so I could continue working. It was a completely seamless changeover to go from native booting to a VM. All I had to do was install open-vm-tools and open-vm-tools-desktop in Ubuntu. Isn’t Linux great?
To be honest: because my Linux computer is pretty important to me for getting actual work done, especially while I am currently working from home, I used this as an opportunity to modernize it. I ordered a new motherboard and CPU. The computer is back in business with brand new capabilities, such as USB 3.0 and Wake-on-LAN that actually works as advertised. I was about due for an upgrade anyway. Yay!
Back to the main story though: my DX58SO motherboard. I really wanted to know what happened to my motherboard, so I started doing some experimenting. I noticed that if I powered it up with the 8-pin 12V CPU power connector disconnected, the motherboard would actually stay powered on and the chipset fan would continue spinning. This suggested it could be a problem related to the CPU power circuit, so I dug deeper into that section of the board.
After doing some research on motherboard CPU power circuits, it became clear that I needed to have a basic understanding of voltage regulator modules (VRMs) and their use on computer motherboards. I learned that motherboards typically take the incoming 12V power from the 8-pin connector and regulate it down to the CPU’s actual voltage which is much lower, using multiple “phases” that activate sequentially. Each phase is made up of an inductor, a high-side MOSFET, and a low-side MOSFET.
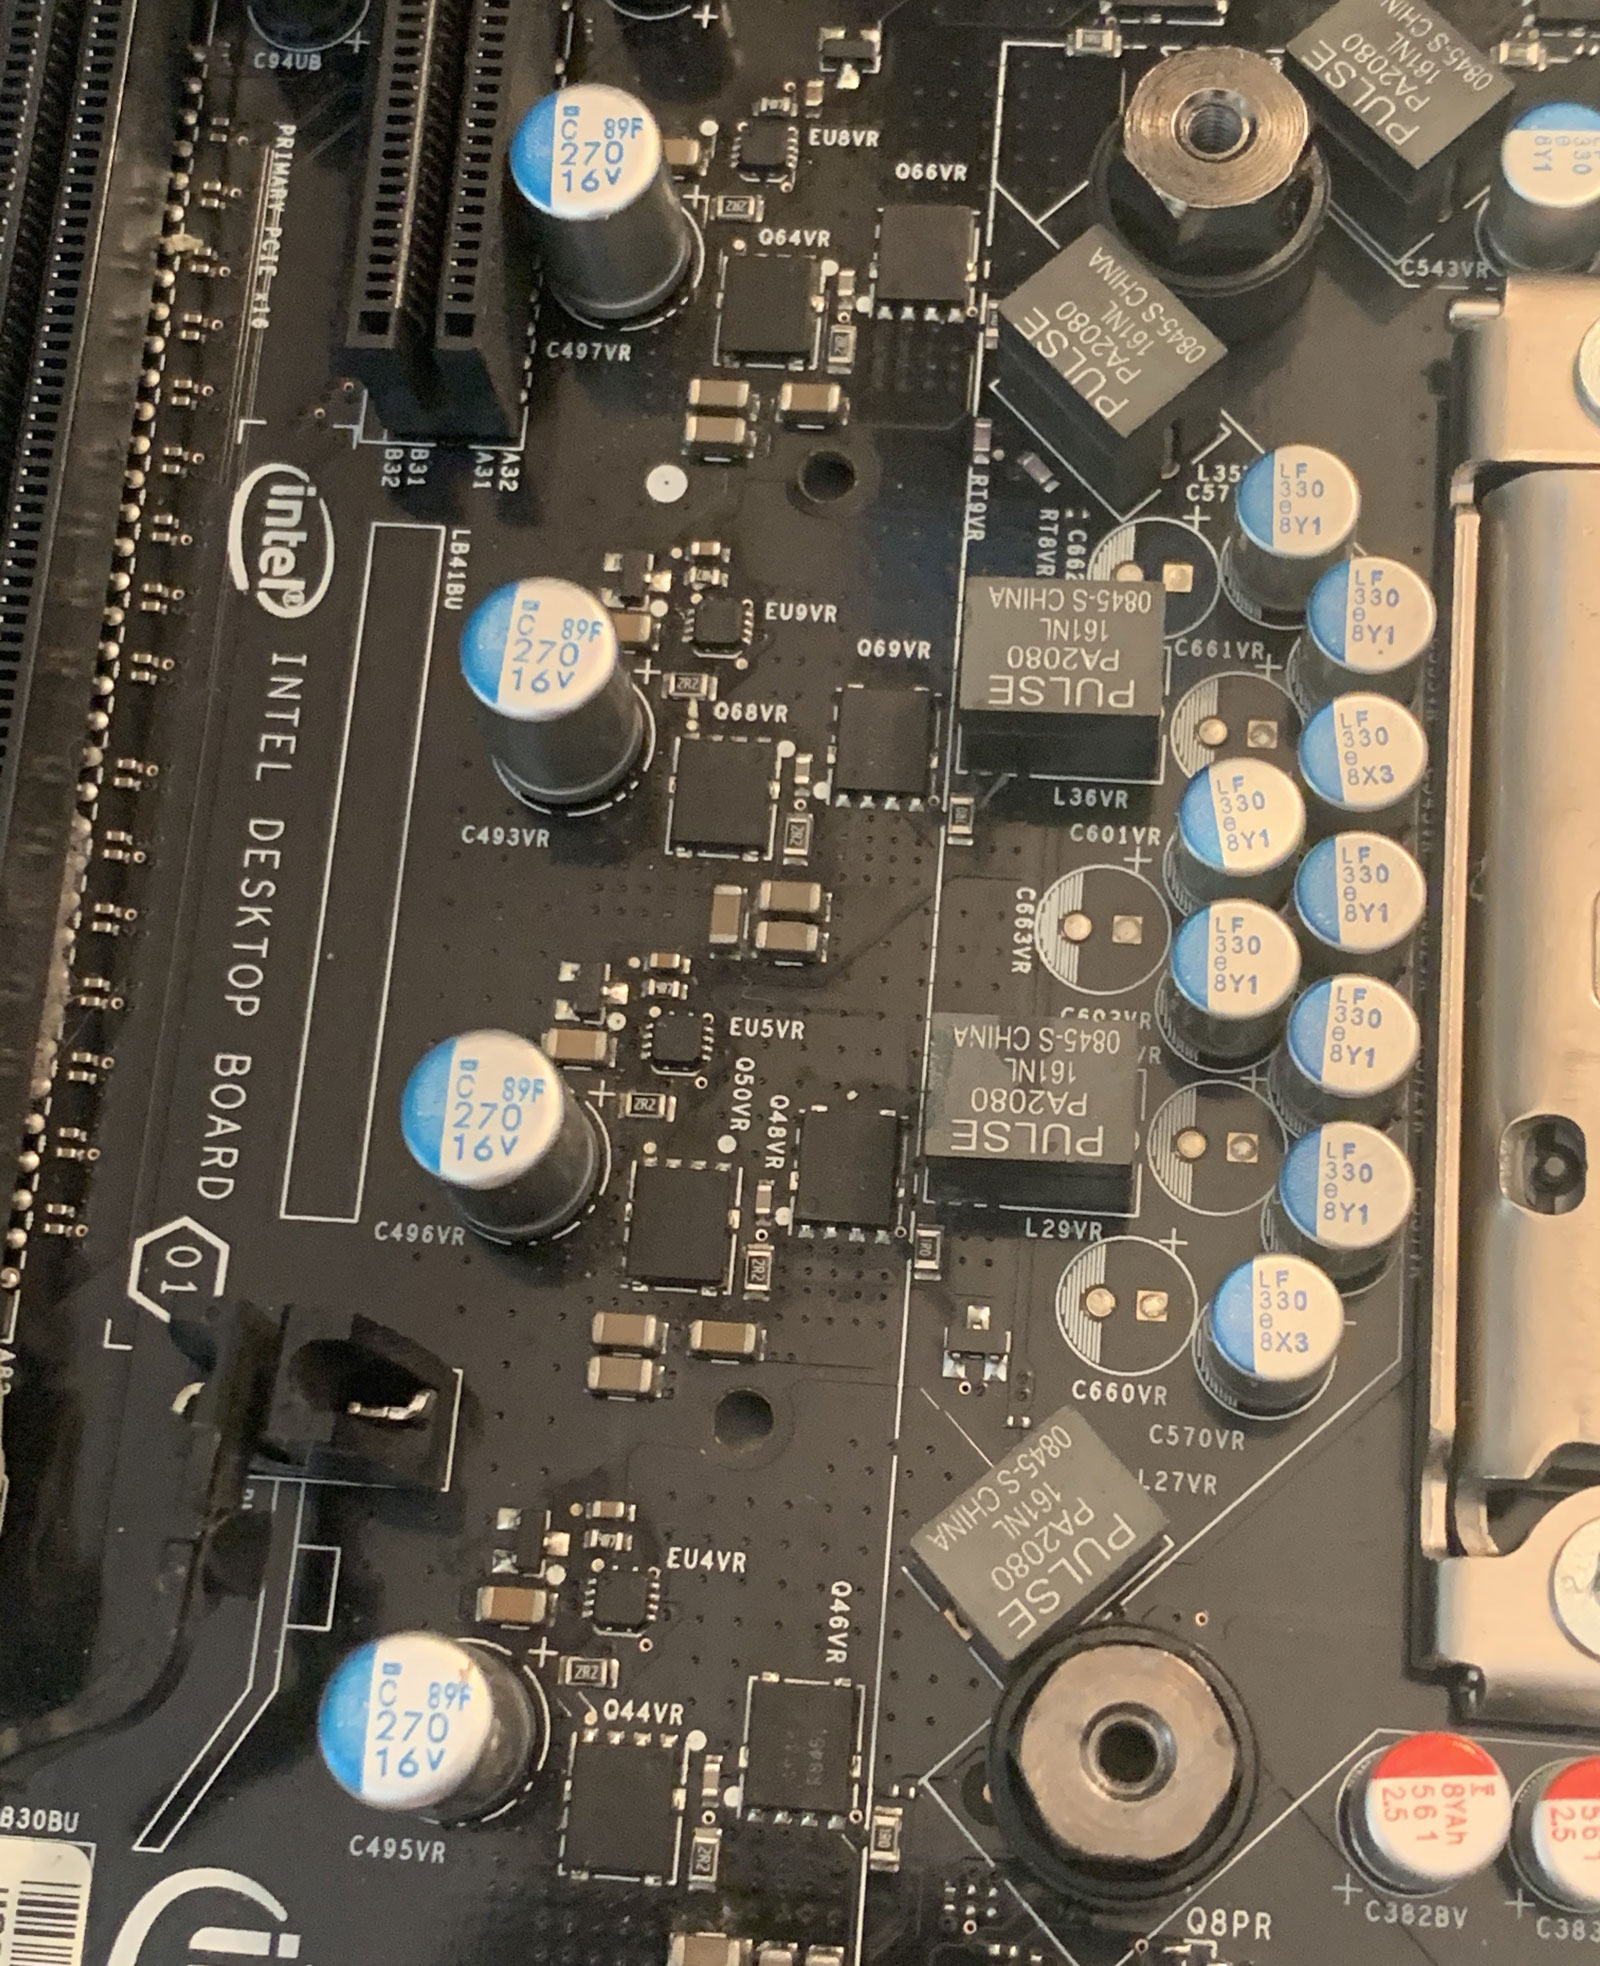
It was pretty easy to notice the 6 inductors around the CPU, along with a capacitor paired with each one. I also saw a couple of heatsinks in the area, so I yanked them off (easier said than done) which revealed 12 MOSFETs — 6 high-side, and 6 low-side. This definitely confirmed that this motherboard’s VRM has 6 phases. It also has a little driver IC per phase that is in charge of controlling the MOSFETs.
Here is a picture showing four of the six phases. You can see the Pulse PA2080 inductors, 270 uF 16V capacitors, high- and low-side MOSFETs, and driver chips for each phase.
Nothing looked obviously damaged, so I inspected the circuit with my trusty multimeter. The way the MOSFETS are arranged is simple. Each high-side MOSFET should be connected to 12V on one side and CPU VCORE on the other side. Each low-side MOSFET should be connected to CPU VCORE on one side and ground on the other side. The gate of each MOSFET should go to a pin on the associated driver chip (the tiny chip in each phase).
In continuity test mode, the multimeter indicated that 12V and CPU VCORE were shorted together. When I checked each high-side MOSFET, its drain and source showed continuity. This is definitely a problem, because it means that 12V is being fed directly to the CPU (well, through an inductor anyway). This also meant that at least one of the high-side MOSFETs was likely blown, but it was hard to know which one(s). The low-side MOSFETs seemed fine. I didn’t observe any continuity between VCORE and ground.
The short circuit between 12V and VCORE probably explains why the computer would shut off immediately. Some kind of protection circuit on either the motherboard or power supply (not sure which) was killing power — which is a good thing. We don’t want to feed 12V directly into the CPU.
At this point I was very concerned that my Core i7-980 CPU was toasted due to 12V being fed directly to it, and probably also my 920 because I had used it as a test to determine if the motherboard was bad. Despite my worries, I continued on with my diagnosis anyway.
I did some more testing by checking each high-side MOSFET’s gate and seeing if it was shorted to the drain and source. Sure enough, I found a single MOSFET which had its gate shorted. So…I removed it using my hot air station.
Easier said than done, by the way…the motherboard really soaks up a lot of heat. I covered all of the surroundings with Kapton tape to try to minimize damage. If I were a professional doing this, I’d have preheated the entire board to make it easier.
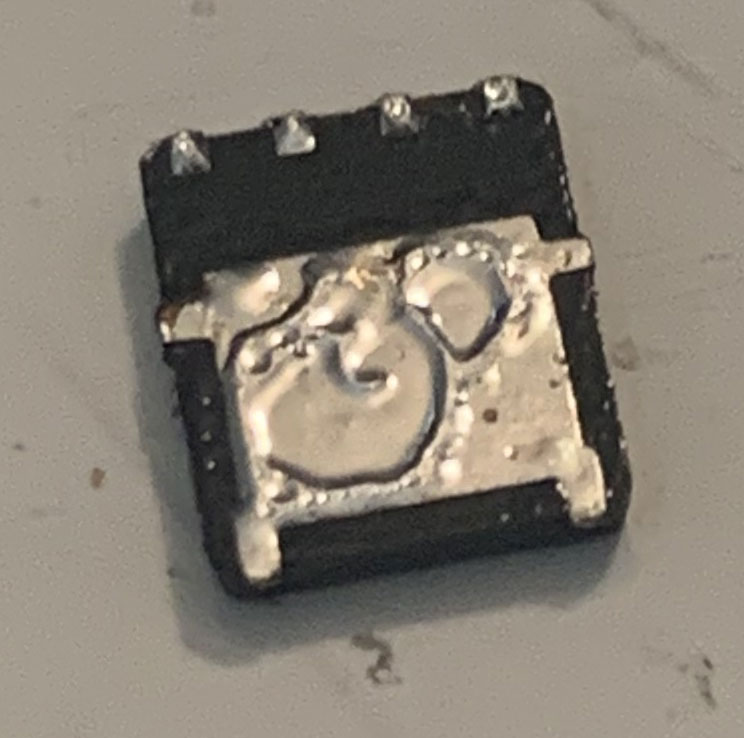
With this MOSFET removed, the short between 12V and VCORE on the motherboard was gone. The short between the gate pin and 12V/VCORE was also gone. I also checked the removed MOSFET itself with my multimeter and observed that the gate, drain, and source were all shorted together. So I was able to confirm that this was the only blown transistor. The MOSFET had this marking:
4841NH
R847
Thanks to some Googling, I discovered this is an ON Semiconductor NTMFS4841NH N-channel power MOSFET. The R847 marking means that it was produced in the 47th week of 2008 at location “R” (whatever that means). You can buy this part on Digi-Key, Mouser, or Newark for 74 cents. I ordered a few of them in case I messed up.
I tried powering on the motherboard with this single MOSFET missing. It showed signs of life — with RAM removed, it would do the beep code for missing RAM. With RAM installed, though, it would power on, but then it would power itself off and back on every 5-10 seconds and nothing ever showed up on the screen. This was encouraging, but I couldn’t do anything other than wait for the new MOSFETs to arrive.
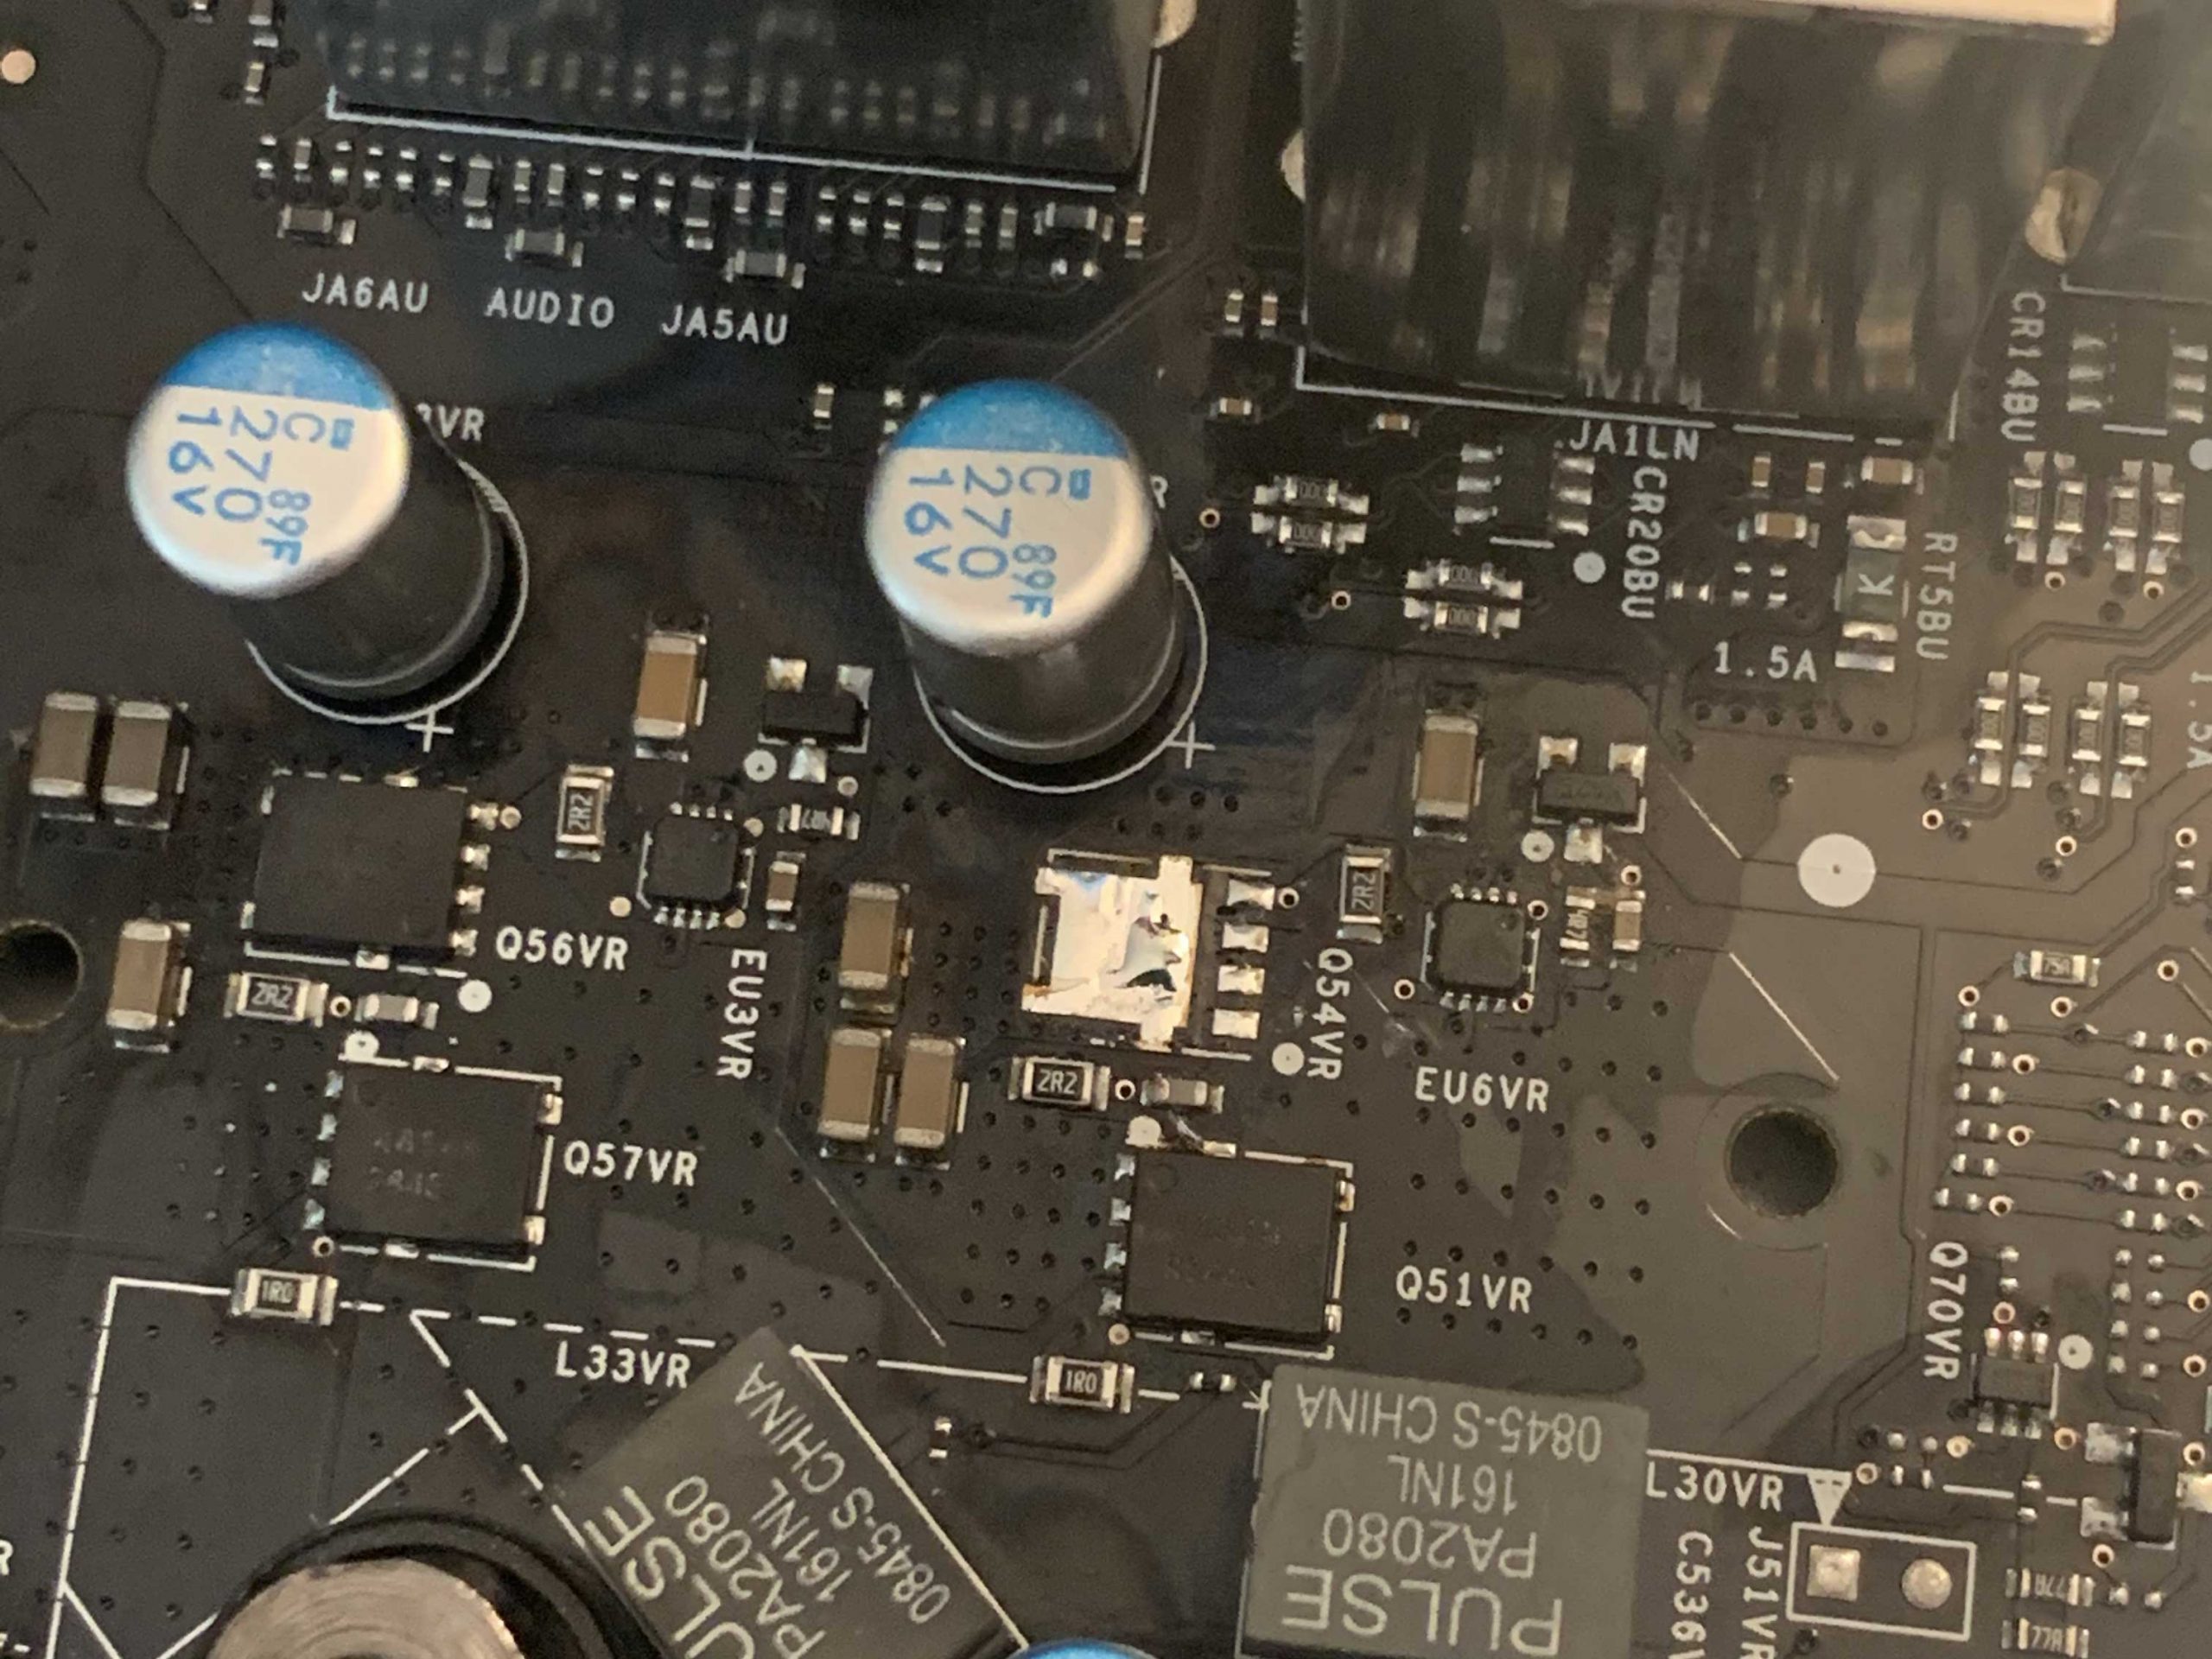
Eventually, they arrived. The second line of their markings is RKDEN, which I don’t know how to interpret for year/week. I guess ON Semiconductor changed their date code scheme without updating the datasheet. Anyway, I added some new leaded solder, cleaned things up a bit, and added flux. Then I used hot air to solder on a replacement transistor (Q54VR in the image below).
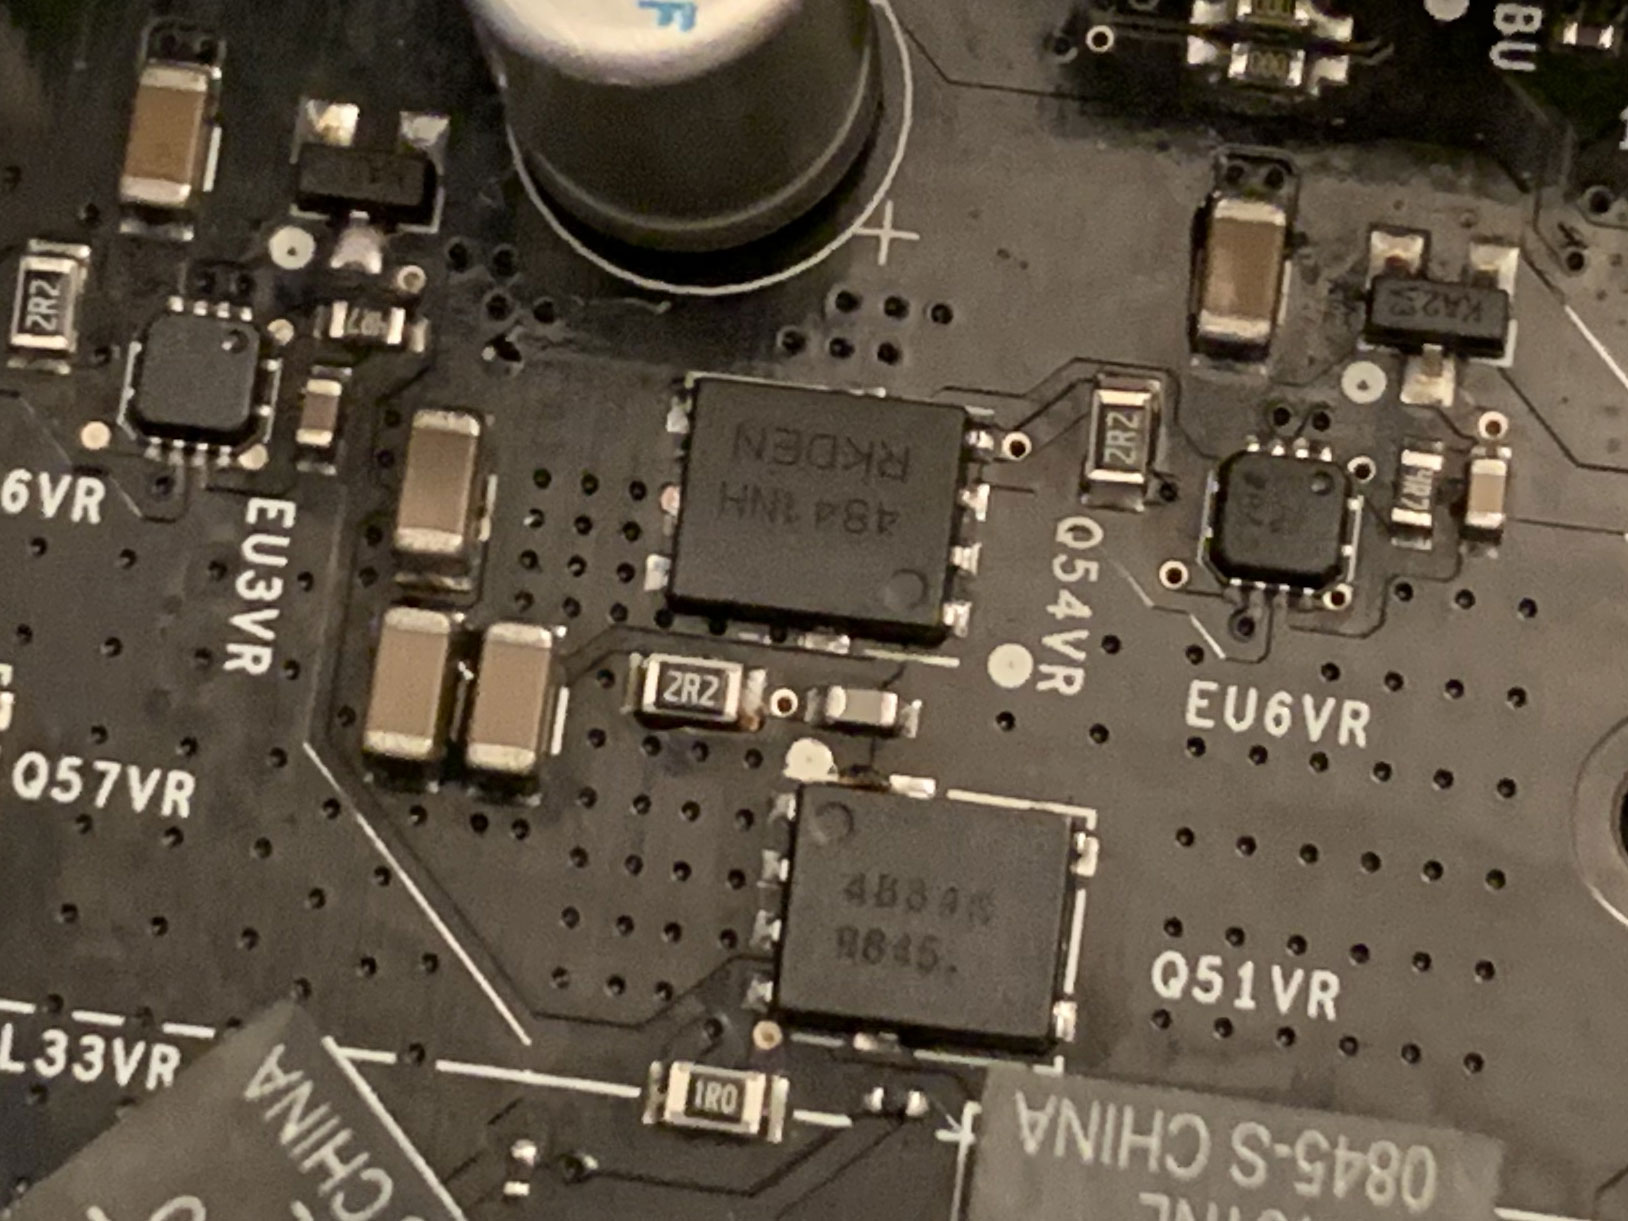
It was much easier to solder the new one on than remove the old one, presumably because I used leaded solder instead of the original lead-free solder. Leaded solder has a lower melting point. I’m pretty happy with how it turned out! I’ve read that the driver chip (EU6VR in this case) is often destroyed when a MOSFET goes bad, but in my case, I decided to wait and see what would happen. I also read that you should replace all of the MOSFETs together when one of them goes bad so that they are matched properly, but I didn’t want to bother.
I hooked everything up, and booted it up, and…
…it’s alive!
I haven’t put it all back together and stress-tested it because I’m waiting for replacement thermal pads for the VRM heatsinks to arrive, but it seems as though that single MOSFET was the problem! The really good news is both my 980 and 920 CPUs still boot to the BIOS fine, so they must have been adequately protected from the 12V short. (Edit: If you’re wondering about the strikethrough here, see the bottom of the post)
When things like this happen, you have to ask yourself what caused it to happen. The blown MOSFET could be a symptom of a deeper problem rather than the actual root problem. I don’t have an easy way to know for sure. It’s possible that if I leave it on for a long time, the MOSFET will blow again. Or maybe a different one will blow instead. My current theory is that the VRM isn’t cooled well enough on this motherboard. I use an aftermarket cooler which doesn’t have a fan blowing straight down, unlike the stock cooler. The fan on my cooler blows sideways instead. In the picture above, you don’t see a CPU fan at all, but I do have one; I just had it removed from the heatsink for this test. I kind of wonder if the stock fan blowing straight down helps cool off the VRM. If that’s the case, it could be a problem again in the future if I continue using my aftermarket cooler. I’m not 100% sure. Maybe I could add some small extra fans on the VRM heatsinks. And should I really replace all 6 of the high-side MOSFETs? The low-side MOSFETs are a different part, so I don’t see any need to replace them, but I suppose I could see an argument for replacing the other 5 high-side MOSFETs so they all come from the same batch. I’d prefer not to subject the board to any more heat though. Plus, it would be annoying and time-consuming.
Even though some uncertainty remains, I’m really excited that I was seemingly able to repair my otherwise perfectly good motherboard by replacing a $0.74 part! It makes me wonder how many more electronic devices are thrown out that only need similar simple fixes. In my case, I was extremely lucky that the exact part I needed was still available at all of the major suppliers. That’s not always the case, especially as devices get older and older.
Will I continue using this motherboard for something? Maybe, if I can think of a good use for it. The Spectre/Meltdown mitigation stuff has already slowed it down from its previous peak performance, at least based on what I’ve read. Intel isn’t updating the microcode for these old processors as new issues pop up. I don’t know how big of a deal this actually is. I do know that these old X58 motherboards have a reputation for being a pretty good bang for the buck when paired with cheap Xeons from eBay. This motherboard does have a few annoying downsides that I mentioned earlier though. It doesn’t have USB 3.0, and its Wake-on-LAN support is broken and doesn’t seem to work. Who knows…I may still find a use for it. At the very least, it created a scenario that warranted a new blog post!
Update 5/25/2020: I finally decided to mess around more with this motherboard. I got some new thermal pads to put on the VRM heatsinks and put everything back together. I put my CPU cooler back on and booted into Ubuntu. It turns out that the motherboard actually killed my 980 CPU when it failed. It does boot to the BIOS, but when I try to boot into Ubuntu, a “Machine Check Exception” kernel panic occurs almost immediately. This honestly doesn’t surprise me considering that 12V was shorted directly to VCORE. The good news is that my old 920 CPU works fine. So the motherboard is repaired…except it killed my really nice 980 CPU. Frustrating, but at least I can verify that my motherboard is definitely repaired. I’ve heard that you can get some cheap Xeons that are just as good as the 980 these days, so maybe I can go for that if I still want this computer to remain operational.


I have the exact motherboard. Had fun reading your post. Would love to have that sort of knowledge about these things. It’s admirable
Hey, thanks! I’m glad you enjoyed reading about my fix. I ended up putting a Xeon W3680 in it, which is pretty much the Xeon equivalent of the i7 980 that got fried. It is still working great.
I’m sad to report that earlier this year, I left the DX58SO powered on for a while and it died again, in a very similar fashion. I haven’t mustered up the motivation to re-diagnose the issue. I think I might have reached the point where the time just isn’t worth it.
Quick question: I just built my pc used i7-920 and DX58SO MB. powers on and stays powered. I get no display, I do see a blue light that flashes on the MB. I know the Video card works in my other pc build–not intel. You have any idea of whats wrong or any suggestions? Thanks
Hi Doug
Do you mind telling me how to get the southbridge heatsink off? There is a wire running across i don’t want to bend or break it. Thanks.
Morris, sorry but I don’t know because I’ve never removed it. I can say that the VRM heatsinks had pins that I had to pull out first.
Andree: no idea. Maybe the manual has blink codes listed somewhere?
@ Morris Enslin, in past past years i try removing the southbridge heatsink off few times to replace thermal paste.
but that wire is so strong and the MB so old i always ended up abandoning it, it was just to risky, and that wire is just so strong.
did you find a way to do that ?
@ Morris Enslin: [UPDATE:] I just managed to very very carefully remove the z-spring metal wire clip.
(cautious about my moves i also used foam padding on the motherboard and used a curved pliers with teeth so it won’t slip on the metal wire)
i also tried prying it with a fishing line between the heatsink & Motherboard (by roughing a fishing line with sandpaper so it can act like a saw)
also tapped the HS itself as hard as i dared with rubber & hard plastic screw driver handle, it head absolute ZERO move in it, nothing!
even lifted the board to feel the underside for other mechanical obstruction, but there isn’t one.
unfortunately, it’s safe to say its permanently glued!
(no its not dry paste or pad that hardened as far as i can tell, because the HS wouldn’t budge at all.)
sorry, was looking forward to put some paste there
but, its not a possibility.
I ended up re-repairing my DX58SO recently. I was so discouraged last time it failed that I couldn’t motivate myself to fix it again. But I finally got around to it earlier this week.
I replaced the shorted MOSFET, as well as the driver IC with it this time. While still in the BIOS, the same MOSFET failed in the exact same way again. This time I did further testing of the phases and noticed the 2.2 ohm resistor from gate to controller on the phase that keeps failing was out of spec (way too high, about 4 ohms) and also replaced it. So far so good, but sadly my Xeon W3680 bit the dust in the last failure so I’m back to the slow i7 920.
I have no idea if I’ve actually fixed the problem, or if it’s just going to fail again eventually. I dunno. It’s still working…for now…
I gave the motherboard, i7 920 CPU, and stock cooler a workout during the last couple of days and it had no problems at all. I’m cautiously optimistic that I fixed it. The VRM heatsinks definitely get quite warm to the touch. I think cooling is very important with this motherboard.
[…] other thing I did was check out the VRM. In one of my previous posts, I repaired my old motherboard that had failed in such a way that 12V was shorted to the CPU VCORE […]
I am running a DX58SO this is typed out on it. I bought 2 new at launch 08 or 09. 1 was an older version and popped a chip over the firewire 1394 header. It smells, but runs OK. I started with 920 and 950. The 950 killed a 700 watt in the v2 newer motherboard. It was a 9 year old Antec power supply it put on a pyrotechnic display. The motherboard lives on. I am running a X5690 and 800 watt PS. I think I’m going to try a Chinese X58 mo/bo to run some REG ECC DDR3 a faster pci buss and USB3. The DX58SO PCI speed holds back my gtx 960.
Russel!! I can’t believe someone else other than me is still using the DX58SO2 board. I found a fully built gaming computer about 4 years ago at an estate sale. It had a price tag on it for $18. I popped it open and thought that dosent look like a normal computer so I texted my cousin and said “what do you think?” he said “get it”.
Me personally at the time had no clue about gaming computers. But as I learned more about this computer turns out is was probably one of the best you could get in like 2011. Here are the stats:
chip – i7 990x
PSU – Corsair 850watt
GPU – gtx 560ti (I upgraded to gtx 970)
RAM – Hyperx 24gb (4×6)
I have been using as an always on computer for Plex media server and gaming.
Russel, I was wondering what do you mean the PCI speed holds back your gtx960?
Thank in advance.
Man oh man, I have an Asus ROG Strix H370-F Motherboard, It ain’t powerin’ the CPU cause the CPU ain’t heatin’ up, therefore I took it to a very known motherboard repairer, all he did was nothin’… I wish we had such dough brown people in here… All the MOSFETs and smd look fine, no physical damage all over the board… Still I wanna discuss one thing with you… I tried to connect the smd towers types from the back of motherboard and they are all sparking means they are fine but the little towers smd near so close to the CPU sockets are not sparking when I connect them together.
I have the same MB and by chance I unplugged one of my HDD without removing the power plug. Though the PC was turned off. But then I switched it on back the fan was running, the Power led was on, even a led on MB was on but no display. and the MB is just lying packed in its box. I tried to get it repaired but they couldnt. so if u can help me out.
Hi Sherry,
The problem you’re describing sounds a little bit different than what I ran into because the fan still runs on yours. It’s hard to know for sure what might be causing it. Maybe a video card problem? I’d probably try another video card just to rule it out. If I’m being honest, this motherboard is so old at this point that repair probably isn’t a practical option. The cost for someone to look into it probably outweighs the value of the motherboard.