I recently released a big update for my Mac ROM SIMM Programmer software which is written using Qt for cross-platform compatibility. As part of the update I wanted to release the Mac build as a universal x86_64/arm64 binary so that M1/M2 Mac users would be able to run it natively. It doesn’t currently compile for Qt 6, although I think I can fix that in the future without too much effort. However, Qt 5.15.9 and later do support creating universal binaries out of the box, so I decided to figure out how to set it all up.
Even though I think I have pretty decent Google-fu, it was difficult to piece everything together to accomplish this goal. I’m hoping this post can serve as a reference for people in the future. These instructions are based on Qt 5.15.10 because that is the latest version of 5.x that is currently open source. I did this on an M2 Mac Mini running macOS 13.5.1 Ventura.
First of all, before anybody suggests it, you can’t use homebrew to install Qt for this because it doesn’t supply a universal build of Qt. If you’re going for an open-source build, you will need to build your own Qt instead. I’m assuming people with a commercial license can just get compiled binaries from Qt. So if you have access to that, you can probably skip the step of building Qt. Otherwise, follow along with me…
Set up a build environment
Qt 5.15.10 officially only supports up to the macOS 12 SDK, so the first step is to install a version of Xcode that includes a macOS 12.x SDK. If you don’t do this, it will probably still work, but I got annoying warnings whenever I built apps with a newer Xcode telling me that my SDK 13.3 was unsupported:
Project WARNING: Qt has only been tested with version 12 of the platform SDK, you're using 13.
Project WARNING: This is an unsupported configuration. You may experience build issues, and by using
Project WARNING: the 13.3 SDK you are opting in to new features that Qt has not been prepared for.
Project WARNING: Please downgrade the SDK you use to build your app to version 12, or configure
Project WARNING: with CONFIG+=sdk_no_version_check when running qmake to silence this warning.
Don’t worry, it’s easy enough to fix this problem without having to use sdk_no_version_check to silence the warning. You won’t have to mess with your existing Xcode setup at all. I downloaded Xcode 14.0, which contains the macOS 12.3 SDK. This site has excellent links to older Xcode versions. It looks like perhaps I should have downloaded 14.0.1 instead…oh well!
I found a lot of Stack Overflow answers about downloading older SDK versions by hand and sticking them in the correct location inside your existing Xcode.app, but the solutions I found always ended up modifying something about your system’s default Xcode, and I didn’t want to do that!
Instead, I extracted the older Xcode, renamed it to Xcode_14, and placed it in my /Applications directory next to my newer Xcode. I don’t think you have to put it in /Applications though.
Next, I set up my environment to use this older Xcode and SDK:
export DEVELOPER_DIR=/Applications/Xcode_14.app/Contents/Developer
This is the magic incantation that tells the system and various automatic SDK detection to temporarily use this custom Xcode rather than the system one in /Applications/Xcode.app, as long as you still have that environment variable set. For some reason this was really difficult for me to find. Maybe it was because I was searching for Qt-related things. All I know is I didn’t want to use xcode-select to change my system-wide Xcode setup.
Build Qt 5.15.10
Download and extract the source code for Qt 5.15.10: qt-everywhere-opensource-src-5.15.10.tar.xz.
tar -xJf qt-everywhere-opensource-src-5.15.10.tar.xz
Make sure you’re in a Terminal window where you have already run the “export DEVELOPER_DIR=…” command from above. Now, follow the steps from CrystalIDEA’s excellent build tools repo to build Qt:
cd qt-everywhere-src-5.15.10
export PATH=$PATH:$(pwd)/qtbase/bin
cd qtbase
./configure QMAKE_APPLE_DEVICE_ARCHS="x86_64 arm64" -opensource -confirm-license \
-nomake examples -nomake tests -no-openssl -securetransport
make -j$(sysctl -n hw.ncpu)
sudo make install
cd ../qttools
qmake
make -j$(sysctl -n hw.ncpu)
sudo make install
cd ../qtmacextras
qmake
make -j$(sysctl -n hw.ncpu)
sudo make install
After running these steps, you should now have a brand spanking new open-source universal install of Qt 5.15.10 in /usr/local/Qt-5.15.10. Note that these instructions seem to only build qtbase, qttools, and qtmacextras. I’m sure if you want, you can build other parts as well. This was all I needed though.
Set up a kit in Qt Creator
Next up, I opened up Qt Creator, went to Preferences, and set up a Qt version and a kit for this new Qt 5.15.10:
- Create a new Qt version, choose the qmake binary at /usr/local/Qt-5.15.10/bin/qmake.
- Note: I had trouble navigating to this directory in the Qt Creator choose file dialog. I was able to open the /usr/local/Qt-5.15.10 directory in the Finder and drag it into Qt Creator’s open file dialog to gain access.
- It will display a warning about no QML utility installed. Ignore the warning, unless you’re actually using QML. If you are using QML, you’ll probably need to build more parts of Qt.
- The Mac Qt Creator preferences UI is kind of janky, so you may need to click OK and then reopen the Qt Creator preferences window at this point in order to save the new Qt version. I couldn’t find the “Apply” button that the Windows version has.
- Create a new Qt kit. Choose “clang (C, arm 64bit at /usr/bin/clang)” and the corresponding C++ version for the compilers. Choose the new Qt version you created as the Qt version.
- Important: customize the environment of this kit. Add the following line:
- DEVELOPER_DIR=/Applications/Xcode_14.app/Contents/Developer
- This ensures that whenever you’re building Qt programs with this kit, it will use the correct version of the macOS SDK.
- Important: customize the environment of this kit. Add the following line:
Build the project in Qt Creator
Open your Qt project. Before you build it the first time, you need to set an option in the project to tell it to build for both x86_64 and arm64. In the Projects tab on the left, under Build for your kit, click Details next to qmake. Make sure to enable both ABIs:
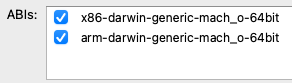
You will be able to tell if it is set up correctly because the “Effective qmake call” will include QMAKE_APPLE_DEVICE_ARCHS=”x86_64 arm64″:

You will likely need to do this for both the Debug and Release build configurations. If you’re more of a “run qmake and make by hand” type of person, the QMAKE_APPLE_DEVICE_ARCHS addition to the qmake command is the way to tell Qt to make a universal binary. Just don’t forget to also export DEVELOPER_DIR as described above if you do it that way. Also, I’m sure there’s a similar process if you use cmake instead of qmake. I didn’t bother figuring it out since my project still uses qmake.
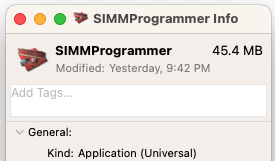
That’s pretty much the process! Now you can build the project. Get Info in the Finder will show that you have created a universal application:
Deploying the app
You may have noticed that the binary in the screenshot above is huge. 45 MB? That’s like a third of the size of the entire hard drive in the Performa 550 we had when I was growing up. Sheesh! My SIMM Programmer utility isn’t that big — it’s because I used Qt’s macdeployqt utility to bundle the universal build of Qt 5.15.10 inside of the app so it can be distributed to anyone. I have an Apple developer account so I can also sign the app with Apple. Here is the process I followed to finish the distribution of SIMMProgrammer.app as a dmg file:
/usr/local/Qt-5.15.10/bin/macdeployqt SIMMProgrammer.app -dmg -sign-for-notarization="Developer ID Application: Your Name Here"
The “Developer ID Application: Your Name Here” should be the name of a signing certificate you already have set up, by the way.
When I run this, I get a bunch of errors:
ERROR: no file at "/usr/lib/libqcocoa.dylib"
ERROR: no file at "/usr/lib/libcocoaprintersupport.dylib"
ERROR: no file at "/usr/lib/libqmacstyle.dylib"
ERROR: no file at "/usr/lib/libqgif.dylib"
ERROR: no file at "/usr/lib/libqico.dylib"
ERROR: no file at "/usr/lib/libqjpeg.dylib"
As far as I can tell, these errors are completely irrelevant and don’t matter. Those libraries definitely end up inside the app bundle in SIMMProgrammer.app/Contents/PlugIns. It seems that macdeployqt is looking for them in the wrong location by default and printing that error, but it still finds them in the proper location and successfully creates the final app bundle and dmg file.
Next, I use notarytool to notarize the dmg:
xcrun notarytool submit SIMMProgrammer.dmg --wait
You will need to add additional parameters to the command to authenticate your developer ID account. I’ve left them out of this example invocation.
Finally, after it all comes back with success, I staple it:
xcrun stapler staple SIMMProgrammer.dmg
After all of that, I finally have a signed, notarized, etc. SIMMProgrammer.dmg file that I can distribute to others. I really struggled to figure out how to get this all set up with Qt 5 to create a universal binary. It definitely took a lot of time and research to figure out this process. I hope this helps someone out there! Special thanks to CrystalIDEA for sharing their Qt build tools with the world. Their info was a huge help.


[…] I recently released a big update for my Mac ROM SIMM Programmer software which is written using Qt for cross-platform compatibility. As part of the update I wanted to release the Mac build as a universal x86_64/arm64 binary so that M1/M2 Mac users would be able to run it natively. It doesn’t currently compile for Qt 6, although I think I can fix that in the future without too much effort. However, Qt 5.15.9 and later do support creating universal binaries out of the box, so I decided to figure out how to set it all up. […]
[…] See the process in the post here. […]
This post has been a godsend. I’ve been trying to build a QT5 application on an M1 MacBook Air running macOS Ventura 13.6. These directions worked, and they are a simpler than other instructions I had tried to cobble together.
For anyone that needs it, QML is provided by qtdeclarative, which I was able to build and install alongside qttools and qtmacextras.
(I did find that QT 5.15.2 won’t build this way. I tried that version because it’s the one that the QT Maintenance tool installs right now.)
Awesome, glad it worked for you Tom! And thanks for sharing the info about getting QML working too.
Yeah, 5.15.2 won’t work like this because 5.15.9 was the first that had the full support for ARM/Intel universal binaries.
Here are a few more things I’ve discovered, since apparently I’m not done fiddling around:
– If you want to mimic how QT is installed by QT Creator on macOS, use something like –prefix=”/Users/${USERNAME}/Qt/5.15.10/x86_64-arm64″ (I made up the last part of that path to mirror QT Creator, and remind myself it’s a universal build).
– You need to Python 2 (2.7 or later) and nodejs (no version requirement afaik) installed to build webengine and a few related modules.
– You can build specific modules and their dependencies directly from the root source directory without modifying PATH or running qmake, like this:
> cd qt-everywhere-src-5.15.10
> make -j$(sysctl -n hw.ncpu) module-qtbase
> make -j$(sysctl -n hw.ncpu) module-qtdeclarative
> make -j$(sysctl -n hw.ncpu) module-qtwebengine
Thanks again for documenting everything.
Thank you so much for the tutorial! I followed it and it worked at everything except one step. I cannot make the qttools, even though I was able to for the rest of the packages. After I created the kit, I run my Qt project and faced the error ‘undefined symbols for architecture x86_64’ and it seems to appear in every qwt class that my project has. Do you have any idea if the problem is the qttools that I was not able to build or maybe if I can separately download a different qwt? I tried with brew install qwt and brew install qwt-qt5 with no success. Any help would be much appreciated!
Hi Natalia,
I’m glad it was useful! I’m not sure why qttools failed to build — it just seemed to work for me. I would look at whatever error is printed when it fails to build and that should give more clues, like maybe you’re missing a dependency it needs. I feel like it would probably be important to figure out qttools first. A build failure there might indicate a deeper problem.
I happen to have some experience with Qwt as well. You’ll probably need to build Qwt by hand using your newly built Qt version. I don’t think it would play nicely with a version installed by homebrew. My instructions are showing how to build a version of Qt for both ARM and Intel, but I’m pretty sure homebrew would only install a version of Qwt native for your CPU. I don’t know how your project is using Qwt, but one way to add it to your project is to include its .pri file from your .pro file. Then you don’t have to worry about building it separately.