After playing around with a ton of parallel port cards in an attempt to figure out Willem programmer compatibility, I decided it would be useful to write a parallel port tester program. Just a simple utility where you can set the output value of each output pin and read the value of each input pin. Several other test programs exist, but I wasn’t happy with their interfaces, and a lot of them weren’t prepared to easily handle PCI/PCI Express/ExpressCard parallel ports. At worst, they only supported the standard parallel port I/O addresses that new motherboards don’t have anymore. At best, they supported custom parallel ports but required you to manually look up the I/O address range of the card.

Oh, and a lot of the existing tools don’t work with newer versions of Windows. I wanted a tool compatible with newer versions of Windows, both 32-bit and 64-bit.

Introducing Parallel Port Tester:

ParallelPortTester

Simply locate your parallel port in the list that appears in the bottom right. I use several methods to discover parallel ports and their I/O ranges, so you shouldn’t need to enter them manually. If for some reason your port doesn’t show up in the list, you can manually enter the base address of your parallel port (e.g. 0x3000) and hit Enter.

You can toggle parallel port outputs on or off by clicking on the circle representing the pin you want to change. Green represents on (high), black represents off (low). The circles representing input pins are automatically updated while you have the port selected, so you can easily test your inputs. You can also choose whether to use the four control pins as inputs or outputs.

For people who are really interested, I also display the raw register values of the three standard parallel port registers. I show separate values for the control register because what you write to the control register is not guaranteed to be what you read back.

Requirements

Let’s get the requirements out of the way. You will need:

  • Windows 2000 or newer. Should work with 2000, XP, Vista, 7, 8, 10, 11, and the various newer server versions. 32- or 64-bit Windows are both supported.
  • Microsoft .NET Framework 2.0 or newer

Download

OK, so you’re ready to download it? Here you go.

ParallelPortPicture_256

Download Parallel Port Tester version 1.0.0.2 installer

Special Thanks

Parallel Port Tester includes InpOut32 1.5.0.1 by Phil Gibbons in order to access the parallel ports directly.

Version History

  • 1.0: Initial release
  • 1.0.0.1: Improves parallel port detection algorithm; previous algorithm was incorrect in certain cases.
  • 1.0.0.2: Fixes a bug that was causing a crash for some users.
    • Note: On 1/17/2022, I added an installer for version 1.0.0.2. Prior to this, you needed to manually download and install InpOut32.

Any problems/questions/concerns? Please let me know in the comments below and I’ll try my best to help get you going. Be careful; it might be possible to fry your parallel port if you hook the outputs up wrong. I’m not responsible for any damage done to your computer by using this software.

For sample code that describes how I detect the computer’s parallel ports in Parallel Port Tester, see my blog post: Detecting parallel ports and their I/O addresses in Windows.

Old Installation Instructions

Prior to 1/17/2022, there was no installer, so you had to install the software manually by downloading and installing InpOut32. Nowadays, you can just download the Parallel Port Tester installer and this will all be handled for you automatically. The old installation instructions are preserved below for historical reference:

  • Download the old ZIP file of Parallel Port Tester 1.0.0.2 that didn’t use an installer.
  • Download InpOut32.dll.
    • Note that I am linking to the best version of InpOut32.dll. It should be compatible with all versions of Windows supported by my program.
  • If you are using Windows Vista or newer, you will need to run the InstallDriver.exe program inside the Win32 directory of InpOut32’s distribution in order to install the driver. You only have to do this once, and it’s just so you can get administrator privileges in order to install the driver. Even if you are on a 64-bit operating system, that’s OK. Still run InstallDriver.exe from the Win32 directory.
  • Put InpOut32.dll from the Win32 directory into the same directory as ParallelPortTester.exe. Don’t use the x64 directory; that DLL would only be for a 64-bit program, but Parallel Port Tester is not a 64-bit program.

My previous blog posting on this subject from a few years ago sparked quite a bit of interest, so I’d like to follow it up with the latest compatibility information I have. First a quick summary:

Traditional Willem EPROM programmers require your computer to have a parallel port, and almost no computers today have them. You can find add-on parallel port cards, but a good chunk of today’s software is written to work directly with the parallel port addresses that were found on motherboards of older computers (0x378, 0x278, and 0x3BC). Add-on PCI/PCI Express/ExpressCard parallel ports don’t use those addresses.

Unfortunately, the Willem software only lets you pick from a hardcoded list of addresses to work with. The good news, however, is that it does its port access through a DLL called io.dll. There are replacement versions of io.dll that trick the Willem software into talking to a different parallel port address:

It’s actually a good thing that multiple options exist, because sometimes one option works for someone while the other option doesn’t, and vice versa. I would like to list what I have discovered about the various options available in terms of both hardware and software.

Parallel port cards

I have tried a total of four different parallel port cards cards, some of which are hard to find at this time:

My experience with these is the following. The Syba cards both use Moschip (now ASIX) chipsets, while the Shentek and StarTech cards use Oxford (now PLX Technologies) chipsets.

Both of the ASIX-based cards seem to work fine with no messing around needed. I’ve tested them on my desktop computer with Windows 7 64-bit (my DLL) and my laptop with Windows XP (Ben’s DLL).

The PLX-based cards throw a couple of curveballs into the picture, though. First of all, their bidirectional control pins (strobe, auto/linefeed, initialize, and select printer) do not have pull-up resistors. This causes a problem because they are open-drain/open-collector outputs, so something needs to pull them up when a high value is needed. Otherwise it’s impossible to use them as outputs — and the Willem programmer uses them as outputs. The Willem programmer (mine, at least) doesn’t supply its own pull-ups for those pins either. So in order to gain compatibility with those two cards, you will need to add pull-ups somewhere. To get these cards to work, I manually soldered some 10Kohm pull-up resistors for those lines onto my Willem board. It was a pretty ugly hack, though, so I removed the pull-ups after successfully testing it. Maybe someone can find a cleaner way to do it.

I have no idea about full-size PCI Express or PCI cards that use the PLX chipset. Perhaps they would already have the pull-up resistors in place. I’m just not sure.

The second issue with the PLX cards is described in the “DLLs” section below.

DLLs

The ASIX cards seem to work great with both my DLL and Ben’s DLL, so no further comments are needed here about them.

The Oxford cards don’t behave quite so nicely with my DLL. It seems that TVicPort has trouble reading bytes from odd addresses with the PLX cards, even though it has no such trouble with the ASIX cards. Inpout32 does not have this same issue. I haven’t narrowed down the root problem, but I don’t really care at this point anyway because there’s a fix: if you’re using a PLX chipset, you should use Ben’s DLL instead of mine.

The original reason I made my DLL was because I couldn’t get Ben’s DLL to work correctly with 64-bit Windows 7. It seems that Inpout32 is now 64-bit compatible (and signed), so it may be possible to simply stick with Ben’s DLL. If you plan on going that route, I would recommend downloading the latest version of Inpout32 and grabbing the Inpout32.dll file included with that to go along with Ben’s io.dll. You’ll want to use the 32-bit version even if you’re on a 64-bit operating system. The reason for that is because the Willem software itself is 32-bit. You may need to run the InstallDriver.exe program included with it to get everything to install correctly, but I’m not an expert at Inpout32.

Testing compatibility

If you’d like, you can test your parallel port card with my Parallel Port Tester utility. Make sure all of the outputs and bidirectional pins can correctly output both high and low values. Physically check each pin with a voltmeter while you test. Every card I’ve seen so far outputs 3.3V as a high value. If your bidirectional pins don’t appear to output a high value correctly (or you get weird readbacks in the tester utility), the high value may be floating, thus indicating you need pull-up resistors on those pins. Also make sure the input pins read a high value with nothing attached and a low value when you ground them. It’s OK if the control pins don’t work correctly as inputs; the Willem programmer uses them all as outputs.

Conclusion

The information available in my original post is still very useful and should help walk you through setting up a Willem programmer with various types of cards. I just wanted to share all of my latest compatibility knowledge in a new post because it was all buried in the comments of my original post.

I can’t remember exactly why, but I recently decided I wanted to play around with Super Nintendo games that support more than two players. I have a Super Nintendo console along with several such games — Super Bomberman, NBA Jam, and Madden 97 come to mind. The most popular adapter designed for this purpose is called the Super Multitap. It plugs into the second controller port on the SNES and provides four controller ports, so you get a total of five ports available for use.

I looked on eBay for Super Multitaps and found plenty for sale, but I decided I wanted to make things more complicated. I stumbled upon a schematic for it, found in the official Super Nintendo developer manual. Google for it if you’re interested — I don’t want to link to it just in case lawyers want to ruin all of the fun. I was intrigued by the simplicity of the circuit. It’s basically 3 chips (a mux and a bunch of tri-state buffers), eight resistors, and the controller connectors. Why buy the ready-made adapter if I could just make my own? In theory, buying the parts would be cheaper than buying a used Multitap on eBay, but in practice, the controller sockets and plugs are hard to find so it’s probably not worth it from a monetary standpoint.

But still, I think it’s worth it for the geek cred! Right?

Well, I decided to do it.

Read the rest of this entry

There are tons of instructions out there for setting up WordPress on a lighttpd server with WP Super Cache. A quick Google search will show you what I’m talking about. I’m not totally happy with them though — it usually boils down to enabling mod_magnet and using a lua script. It’s not too surprising that it requires a bit of trickery because the main instructions that come with WP Super Cache are designed with Apache in mind.

I’d like to share the setup I use on this blog, which takes more manual effort initially but no longer requires the use of a lua script.

I first obtained these instructions from a blog which no longer exists, but the original instructions are still available from the wonderful Internet Archive. Since the original page is no longer around in Google results, I feel like I need to keep the instructions alive. So…here they are, in my own words and modified for a newer version of lighttpd:

First of all, set up WP Super Cache for mod_rewrite mode. It’ll warn you that mod_rewrite isn’t installed and the rewrite rules must be updated — this is perfectly OK because we’re not using Apache.

Now, in the main WordPress directory, create symlinks to everything in the wp-content/cache/supercache/www.domain-name.com directory. Here’s an example symlink command for the “2010” directory:

ln -s wp-content/cache/supercache/www.domain-name.com/2010 2010

I had to create the following symlinks on my server:

2010, 2011, 2012, category, contact, index.html, and microcontroller-lessons

Every time you add a new page with a root directory URL or another year goes by, you will need to add an appropriate symlink or else the supercaching for that page won’t be active–it’ll be served through PHP instead, so the site won’t break if that happens — it’ll just be inefficient.

OK. Now that you have that done, disable directory listings, set the 404 error handler to /index.php, and ensure that index.html comes before index.php in the list of index file names. That last one about index.html being in front of index.php simply ensures your main blog page is served supercached correctly. Anyway, this can all be done in lighttpd.conf:

server.error-handler-404 = "/index.php"
dir-listing.activate = "disable"
index-file.names = ( "index.html", "index.php" )

That’s it! It’s about as simple as it can get.

Is it perfect? No, not at all. It doesn’t matter if you’re logged in or not — if a supercached version of a page exists and you go to its URL, you will get the supercached version rather than a newly-generated version of the page–meaning you don’t get the cool WordPress toolbar at the top. So it isn’t smart enough to look at your cookies or anything like that to only serve supercached files to non-logged-in users. In my case, I don’t really care — I can still access the WordPress Dashboard and that’s all that really matters to me.

It’s also kind of annoying that you have to create a new symlink for everything that is in the “wp-content/cache/supercache/www.domain.com” directory, but I can live with it.

It appears to work because if a supercached version of a page doesn’t exist already, a 404 error occurs, which passes the request onto /index.php, which figures out the original request.

Thanks again to the (now defunct) Zash Blag for the original instructions. There may be better solutions available than this — if there are, please leave a comment! I would definitely be interested in trying them out.

Edit: With the latest kernel updates, this hack should no longer be necessary in Ubuntu 12.04 or 12.10. I’m leaving this post in place for future reference if people run into the same issue with newer iPhone revisions as they come out.

Here’s the scenario: you’re using an Ubuntu distribution (perhaps 11.10 or 12.04 or 12.10, but I’ve only tested this on 12.10) and you’ve followed the various instructions around the internet for tethering your iPhone using a USB connection in Linux, but it just doesn’t work on your iPhone 5 no matter what you try, despite it working on an older iPhone model just fine.

What gives?

The problem is that iPhone 5 support was added to the ipheth driver in the Linux kernel in October, and that particular patch hasn’t been added to the kernel Ubuntu is using yet.

Look at the patch. All they did was add an extra item to the end of a static array. It looks exactly the same as all the rest of the entries, with the exception of a different USB device ID. If you don’t want to backport the patch and recompile the kernel module and all that, we could just modify the binary ipheth driver so one of the existing iPhone device ID entries matches the iPhone 5 instead of its original device ID. It’s a little more tricky to append to the array by just modifying the binary, so changing an existing entry in the array is an easier alternative. Let’s do it!

Make a copy of /lib/modules/<your kernel version>/kernel/drivers/net/usb/ipheth.ko and put it somewhere. We’ll mess with the copy, so leave your existing driver alone just to be safe.

Decide on an iPhone model you don’t need support for. In my case, I just picked the iPhone 3GS. In the code of the ipheth driver, find its corresponding USB device ID. For the iPhone 3GS, it’s 0x1294. Now, using your favorite hex editor (I personally like running HxD in Wine), search for that string, but reverse the bytes (unless you happen to be on a big-endian system like PowerPC). So in my case, I would search for the hex string 0x9412. Once you find it, confirm that it has 0xAC05 directly before it. This just confirms it’s part of the device ID table and not just a random chunk of code or data that happens to be the same. OK, so you’ve found it. Replace the old hex string (0x9412) with the iPhone 5’s USB device ID (it’s 0x12a8, so you will use 0xa812).

Save the file.  Manually unload the old driver if it was already loaded by typing:

sudo rmmod ipheth

Now, load the new one:

sudo insmod /path/to/new/ipheth.ko

Try plugging the iPhone 5 in now. It should be recognized as a network interface!

You’ll have to manually load this kernel module with the insmod command every time you reboot your system, and every time you install a kernel update, you should probably redo the patch on the latest version of the ipheth module, but it works! If you’re feeling extra clever, I think you could actually leave the modified version of the driver in place where the regular driver goes and add a line to modules.usbmap so it will automatically load the new ipheth module when the iPhone is plugged in, but I’m not going to get into that.

So there you have it: a quick and dirty way to make your iPhone 5 USB tethering work until Ubuntu either starts using a newer kernel or backports iPhone 5 support.

This is kind of an odd topic, but it’s something worth checking out. Let’s make it nice and simple. You’re looking for the JEDEC standards for RAM, ROM, EPROM, EEPROM, Flash, etc. It might be pinout information or programming command sequences that you want to find. Where do you go to find it?

You go to JEDEC, of course. The problem is that JEDEC’s site is kind of confusing to follow. The first thing you need to know is that the standard for memory is called JESD21-C. You can order a hardcopy, but you really don’t want to do that. You just want a PDF, right? Well, you’re in luck — sort of.

JEDEC provides the standards for free download (as long as you register — no big deal), except they break it down into tiny sections. On the JESD21-C site, you can find download links to the Table of Contents, Terms and Definitions, General, Applicable Other Documents, and Differences between revisions. These are mostly summary things, but the table of contents is the most useful part. If you download that, you can find a list of everything JESD21-C has to offer. Section 2 — Terms and Definitions — is also very helpful, because it gives you some definitions you might need to know for pin names. Notice that sections 4 and 5 are not links. That’s where all of the important information lives! How are you supposed to get there? Keep reading.

Once you’ve discovered which standard you need in the table of contents (typically in section 3 or 4), you can find it by looking in the correct category under the sidebar on the right called “JESD21-C Standards”. Click on the section containing the standard you want, and a list of all standards belonging to that section will come up. Find the correct one and, after logging in, download it!

It’s great that JEDEC provides all of these standards for free download. I do honestly think it’s a bit annoying that they break it up into tiny sections though. Why not offer one huge PDF containing it all? I guess you could manually download every document and use a PDF editor to combine them all into a single PDF if you want.

Example search:

I’ve been using the SST39SF040 in my programmable Mac ROM SIMM project. I know that the datasheet for the chip contains everything I need to know, but I was curious about what the standard had to say. The SST39SF040 is a 4 megabit (512K x8) flash chip. In particular, I’m using the variant that comes in a PLCC32 form factor. It doesn’t have a separate VPP programming pin — the only power supplied is through VCC. This means it’s a “single supply” chip, as opposed to a “dual supply” chip. Although it’s sectored flash rather than byte-erasable EEPROM, the info about EEPROMs still mostly applies.

So first of all, I find the section on EEPROMs — section 3.5. In addition, I know it’s a byte-wide chip (x8), so I know I’m going to be looking under section 3.5.1.

Next, I just skim all of the sections underneath 3.5.1 until I find section 3.5.1.14 — 128K to 512K by 8 Single-Supply EEPROM Family in DIP RCC and TSOP1. That’s the one I need! (RCC is pretty much another name for PLCC in this case) So I download the JESD21-C section 3.5.1 document from JEDEC’s site, and sure enough, there’s the pinout — and it matches what the SST39SF040’s datasheet says. The only really noticeable difference is that JEDEC uses the terms E, G, and W in place of the more-commonly-seen CE, OE, and WE. This is all explained in the Terms and Definitions document, though.

Conclusion:

I hope this helps someone else out there who is trying to navigate the JEDEC specs. There are a lot of them, but once you know where to go on JEDEC’s site, it’s not too bad.


Introduction

OpenOCD is an extremely useful (and free!) piece of software for microcontroller programming. In particular, I use it to program to and debug with various development boards I have laying around. I have a Luminary Micro/TI Stellaris LM3S2965 evaluation kit that has a built-in USB port which can be used for JTAG. The board also has a JTAG connector on it, so you can use it as a passthrough for JTAG on another board. The JTAG is powered by an FTDI FT2232D USB to serial chip. Just calling it a USB to serial chip is not giving it quite enough credit, though — it can be used for all kinds of crazy things, including JTAG. I would venture a guess that most USB to JTAG adapters you can buy are really just a simple board with this chip on it connected to a JTAG connector on one end, and USB on the other.

Anyway, OpenOCD is a bit interesting. It can interface to FT2232-based JTAG devices with two options for communication. The first option is libftdi, an open-source library that uses libusb to talk to the FTDI chip. The second option is ftd2xx, which is a proprietary library provided by FTDI itself (which also appears to be based on libusb?).

So naturally the question is: which one should you use?

Well, I think it depends on your specific needs. I first got OpenOCD working a couple of years ago in Ubuntu Linux. At the time, it didn’t really matter to me which library to use, so I tried them both. My experience was that FTDI’s own driver was much faster than libftdi. The situation may have changed since then, but I haven’t had a reason to change my setup.

When I got OpenOCD working on Windows 7 64-bit, it got even more interesting. At the time, libusb was not a signed driver, so it was a huge pain in the butt to get it to work with Windows 7. Apparently you could get it to work by starting up Windows with a special option in the same startup menu you’d use to boot into safe mode. But you’d have to do that EVERY time you booted, or the driver wouldn’t work. That’s my understanding of the situation, anyway. The other option was just to use FTDI’s driver and forget about it all. So I did.

Things have changed since then, though. libusb is now available as a signed driver that won’t make you jump through hoops on Windows. I haven’t tested libftdi lately to see how it compares performance-wise to ftd2xx. Anyway, I’ve stuck with ftd2xx just because it’s what I started with, so this post will be about the ftd2xx library. It’s very possible that my instructions will still work with libftdi though!

Anyway, here’s the other thing about the ftd2xx library. It’s a proprietary library incompatible with the license used by OpenOCD (GPL). So you won’t be able to find a (legally good) distribution of OpenOCD that has the ftd2xx library capability built-in. It’s perfectly OK to distribute OpenOCD that’s linked against libftdi since it’s compatible with the “viral” GPL. But since back in the day I needed OpenOCD with ftd2xx, I had to compile it myself.

I recently had to compile OpenOCD for 64-bit Windows again. That’s where this blog post comes in.

Compiling OpenOCD for Windows

There are a few options you can use to compile stuff designed for GNU tools in Windows. One example would be MSYS, and another would be Cygwin. These are both EXCELLENT environments, but I don’t like having to install a bunch of their stuff on my computer just for the sole purpose of having all the crazy tools necessary to be able to compile OpenOCD. I’d rather keep my Windows partition nice and clean to the point where I just have the OpenOCD executable and any supporting libraries, and that’s it. But how do you get past needing all the stuff necessary to run configure scripts, process Makefiles, and yadda yadda yadda?

You cross-compile it for Windows using Linux and MinGW! That’s how!

Here are the basic instructions I found on Dangerous Prototypes for cross-compiling OpenOCD for Windows from Linux. I tried to follow them step-by-step, but I ran into a few snags, so I decided to make my own post that will go step-by-step through compiling OpenOCD for 64-bit Windows (Vista and 7, and probably 64-bit XP too?). I see no reason why this shouldn’t work on a 32-bit platform as well–just substitute any 64-bit compilers/tools I specify with the corresponding 32-bit versions instead!

I had trouble getting 64-bit MinGW to work correctly in Ubuntu, so this post by Matpen on the Ubuntu forums also helped me immensely. I’m guessing if you’re doing a 32-bit compile, you don’t need to worry about the problems I had with the 64-bit MinGW included with Ubuntu. The version included with Ubuntu 10.04 had a really deep problem in that it doesn’t include libgcc_s.a, and the version included with Ubuntu 11.04 has problems such as not providing a getopt.h include file.

Finally, I had more trouble getting OpenOCD to link against the ftd2xx library after I solved the first problem, and this post by el_nihilo on the SparkFun forums also helped me out.

I’m hoping that by combining the instructions from these three sources, I can create a single source that anyone can go to in order to get OpenOCD to compile on the FIRST TRY. Here goes nothing!

Prerequisites (for Ubuntu 12.04)

Since I first wrote this article, Ubuntu 12.04 came out, and this process is MUCH simpler to get working with it. The supplied toolchains work fine now. All you need to do is:

sudo apt-get install mingw-w64

No need to install weird packages or regenerate FTDI’s .lib file. Great!

Prerequisites (for Ubuntu < 12.04)

You’re going to need an install of Ubuntu (32-bit or 64-bit — your choice). I have successfully tested this procedure on the 64-bit version of Ubuntu 10.04,  the 32-bit version of Ubuntu 10.10, and the 64-bit version of Ubuntu 11.04. Use whatever you’d like. You can do it on a separate partition, in a VMware Player virtual machine, or whatever else it takes to get Ubuntu.

To start, we’re going to install some packages that Ubuntu will need:

sudo apt-get install libcloog-ppl0 libgmpxx4ldbl libmpfr1ldbl libppl-c2 libppl7

Now, rather than use Ubuntu’s provided 64-bit MinGW package, which does not work (as of this writing), we will instead use a version which does. So get the two packages that apply to you and install them:

If you’re on a 32-bit version of Ubuntu:

wget http://ppa.launchpad.net/mingw-packages/ppa/ubuntu/pool/main/w/w64-toolchain/i686-w64-mingw32-toolchain_1.0b+201011211643-0w2273g93970b22426p16~karmic1_i386.deb
wget http://ppa.launchpad.net/mingw-packages/ppa/ubuntu/pool/main/w/w64-toolchain/x86-64-w64-mingw32-toolchain_1.0b+201011211643-0w2273g93970b22426p16~karmic1_i386.deb

dpkg -i i686-w64-mingw32-toolchain_1.0b+201011211643-0w2273g93970b22426p16~karmic1_i386.deb
dpkg -i x86-64-w64-mingw32-toolchain_1.0b+201011211643-0w2273g93970b22426p16~karmic1_i386.deb

If you’re on a 64-bit version of Ubuntu:

wget http://ppa.launchpad.net/mingw-packages/ppa/ubuntu/pool/main/w/w64-toolchain/i686-w64-mingw32-toolchain_1.0b+201011211643-0w2273g93970b22426p16~karmic1_amd64.deb
wget http://ppa.launchpad.net/mingw-packages/ppa/ubuntu/pool/main/w/w64-toolchain/x86-64-w64-mingw32-toolchain_1.0b+201011211643-0w2273g93970b22426p16~karmic1_amd64.deb

dpkg -i i686-w64-mingw32-toolchain_1.0b+201011211643-0w2273g93970b22426p16~karmic1_amd64.deb
dpkg -i x86-64-w64-mingw32-toolchain_1.0b+201011211643-0w2273g93970b22426p16~karmic1_amd64.deb

These commands will install special versions of MinGW that aren’t broken for producing 64-bit code. I’m not 100% sure if you actually need to do the i686 toolchain as well, but I’ve included them because the original steps from the Ubuntu forums also included them. The packages may say Karmic in the filenames, but I was also able to install them successfully in 10.04, 10.10, and 11.04.

Downloading OpenOCD and FTDI’s library

So now let’s grab OpenOCD and the FTDI library:

wget http://download.berlios.de/openocd/openocd-0.5.0.tar.bz2
wget http://www.ftdichip.com/Drivers/CDM/CDM20814_WHQL_Certified.zip

First, if you’re using the MinGW toolchain from before Ubuntu 12.04, you need to regenerate the FTDI library’s .lib file, because it and that MinGW version just don’t get along. If you have Ubuntu 12.04 and its built-in MinGW toolchain, skip down to “The actual compilation of OpenOCD.” If you have an Ubuntu version before 12.04 and don’t do this step, the final link of openocd.exe will fail with several errors similar to: undefined reference to `__imp__FT_Write’. Extract CDM20814_WHQL_Certified.zip and do the following commands:

cd CDM20814_WHQL_Certified/amd64
echo "LIBRARY ftd2xx64.dll" > ftd2xx64.def
echo "EXPORTS" >> ftd2xx64.def
strings ftd2xx64.dll | grep FT_ >> ftd2xx64.def
mv ftd2xx.lib ftd2xx.lib.old
x86_64-w64-mingw32-dlltool -d ftd2xx64.def -l ftd2xx.lib

If you go to the post by el_nihilo on the SparkFun forums which I mentioned earlier, you’ll see what’s going on. It has to do with the difference between how DLL function names are expected to be prefixed in Visual C++ and MinGW. It’s pretty goofy that there have to be all these stupid incompatibilities, but this clever little trick fixes it by regenerating the .lib file so it’s compatible with MinGW. This step was borrowed directly from that post.

Once all this preparation is done, it’s now safe to try to install OpenOCD!

The actual compilation of OpenOCD

Now, compiling OpenOCD is relatively straightforward!

Go into the OpenOCD directory, and do this command:

./configure --host=x86_64-w64-mingw32 --disable-werror --with-ftd2xx-win32-zipdir=/path/to/CDM20814_WHQL_Certified --with-ftd2xx-lib=static --enable-ft2232_ftd2xx --prefix=$PWD/_install

Let’s step through the options we gave to the configure script so we make sure we understand what it’s doing.

  • --host=x86_64-w64-mingw32

    specifies that we are compiling for a different host that we’re running on now. This is how we tell it to use the MinGW cross compiler.

  • --disable-werror

    makes it so a compiler warning is not treated as an error. We will get some compiler warnings which would cause the build to fail if we didn’t provide this option. The warnings seem to be harmless; it works just fine!

  • --with-ftd2xx-win32-zipdir=/path/to/CDM20814_WHQL_Certified

    is just the path to the folder containing the contents of the extracted zip file with the ftd2xx driver and libraries. It’s telling the configure script where to find the header file and library to compile/link against.

  • --with-ftd2xx-lib=static

    supposedly tells it to link OpenOCD against the static library instead of the dynamic library. Despite that fact, I still have to include ftd2xx64.dll with the final generated binary. Not sure why, but it works!

  • --enable-ft2232_ftd2xx

    tells the configure script that we’re going to want FT2232 support provided by the ftd2xx proprietary library.

  • --prefix=$PWD/_install

    just tells it to install in a directory called _install in the current directory instead of the default location of /usr/local. Since we’re just going to be transporting it over to the Windows computer when done, it makes no sense to install it in /usr/local.

So, do it!

Then, when it’s done and succeeds (hopefully), compile it:

make

and install it:

make install

Now, your OpenOCD directory should have a directory called _install inside of it, containing several directories including (almost) everything you need to get OpenOCD running on Windows! The only thing it’s missing is ftd2xx64.dll. Grab it from the CDM20814_WHQL_Certified/amd64 directory and stick it in the bin directory alongside openocd.exe. At this point, you should be able to transfer this directory over to your Windows partition/machine/whatever and run OpenOCD just like any other random Windows console app.

Hope this helps someone else who, like me, was struggling to get it to work!

Note: I have written a post containing updated compatibility information you may want to read here. The remainder of this post below is still very important, but I’d like to make sure everyone has the most up-to-date information about compatibility between the different DLLs and parallel port cards out there. If you’re looking for my patched io.dll for Willem programmer compatibility, see below.

Last year I bought a Willem EPROM programmer board from Sivava. It’s basically a cool little board with various sockets for plugging in EPROM/EEPROM/Flash/etc chips for reading/erasing/writing. Apparently it can even program some AVR microcontrollers. I have the PCB50 version of the board.

Here’s the deal. It has a USB port, but it’s only for supplying power. All communication goes through the parallel port. As everybody should know at this point, the parallel port is on the way out. No, scratch that. The parallel port is long gone. I had to use a really old HP Pavilion with a Celeron running Windows 98 to do anything with it. The programmer worked great, and I was able to fix a computer’s BIOS chip that I had messed up while trying to hack its BIOS.

Let’s fast forward to over a year later (a.k.a. now). I have a homebuilt PC with an Intel DX58SO motherboard and a Core i7 CPU, running Windows 7 Ultimate edition, 64-bit. The DX58SO literally has no legacy peripherals, other than a single PCI slot. It has no PS/2 ports, no parallel port, no serial ports, and no standard IDE ports. It does have a variety of types of PCI Express slots, though.

I recently bought a sweet PCI Express 1x card with four serial ports and a parallel port from Newegg. (Note: Newegg’s product specs lie about this card — the parallel port does not support EPP or ECP mode, according to a sticker on the box, even though Newegg says it does). I remembered that I had my programmer and decided I totally needed to get it working in Windows 7.

Easier said than done.

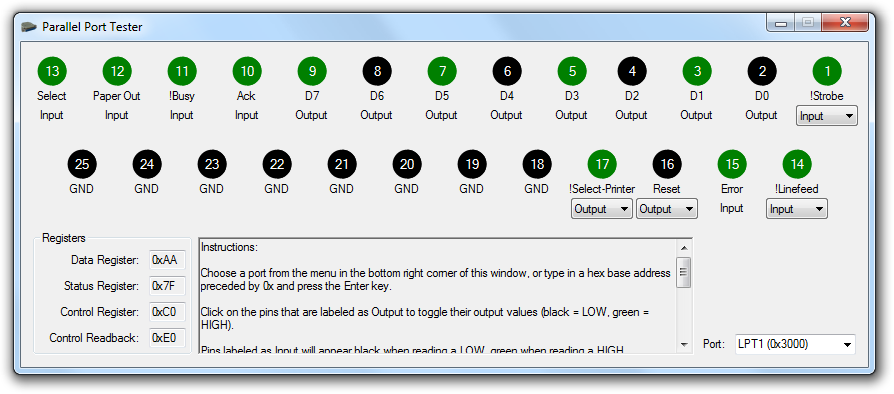
It’s difficult enough to get low-level legacy stuff working in Windows 7, but when you’re using the 64-bit edition, a lot of older stuff breaks even more. Also let’s remember that add-on parallel ports do not get mapped to the standard I/O addresses for parallel ports (0x378 and 0x278), but instead some other random address (mine is at 0x3000). I tried running the software that came with the board, but it just gives me errors and actually won’t let me exit without forcing it to quit from the task manager.

Let’s go on a Google adventure. Google lesson #1: sometimes when you’re looking for info about Windows 7 64-bit, you can find very useful stuff when you search for Vista 64-bit (or XP 64-bit) instead. My first search was willem vista 64-bit.

The second result was a digg posting titled Willem Eprom for Vista and 64bit XP (digg post is no longer available; link removed). The linked page is a forum posting at a forum called onecamonly.com. The post is by the admin of the site, and he mentions to install software called TVicPort and then a modified io.dll file. The first comment on the digg posting was by a user named rabitguy, who said he had a Willem board working on Windows 7 64-bit with tvicport and iodllwrapper.

So I kept seeing this io.dll and iodllwrapper stuff. What exactly is it? Let’s Google for “io.dll”.

The first result is to a homepage for io.dll. Basically, it explains that it’s a library allowing direct port access from several different Windows versions. Awesome! Except it doesn’t mention Windows Vista or Windows 7, or anything 64-bit at all. Crap. Well, I looked in the installation directory for the Willem software that came with my Sivava programmer board, and sure enough, in C:\Program Files (x86)\EPROM50, there’s an evil file named io.dll. So that’s why it doesn’t work.

So anyway, I searched for iodllwrapper, deciding to follow the advice of rabitguy. The first result is to a forum posting on an Amiga message board. I did a search on that page for “Willem” and found a posting by Toni Wilen who wrote a 64-bit-compatible io.dll wrapper which depends on TVicPort and uploaded it as an attachment to the forum, called iodllwrapper.zip. He even included the source code. Aha! So I think I get it. He wrote a DLL that provides all the functions that io.dll would provide, except rather than implementing the raw functionality himself, he forwards the relevant function calls to TVicPort, which handles all the low level stuff (in a manner that works on 64-bit operating systems!). Actually it’s a pretty genius idea. So I downloaded his DLL and tried it out, replacing the stock io.dll file that came with the Willem software with his new wrapper.

I crossed my fingers and opened the programmer software. Awesome! I no longer got a bunch of weird errors when the program opened! I’m pretty sure Toni’s DLL would have worked great, but there’s a problem in my case. I don’t have a built-in parallel port, so my parallel port is at a non-standard I/O address (0x3000). The Willem software only lets you choose from a list of three standard I/O addresses where built-in parallel ports would appear.

Ugh! So I was stuck again. At this point I was about to throw in the towel. But first, I thought about it and came to the conclusion that I can’t be the only one with this problem. So I searched for io.dll willem address.

The first result this time was Ben Ryves’ Remapped IO.DLL. So someone else had the exact same problem! Ben also wrote an IO.DLL wrapper (and he included his source code, too!). His solution is to add an additional file called io.ini into the same directory as io.dll. You put the I/O address of your parallel port into that file (so my io.ini file would contain one line — 0x3000), and set the Willem software to use LPT1. The wrapper DLL looks for any I/O reads/writes in the LPT1 range and remaps them to actually occur at the address specified in the io.ini file. This is exactly what I needed!

It uses another DLL called inpout32.dll to do the dirty work. Actually, Ben’s site very nicely describes everything his DLL does, so I won’t go into any more detail about it.

Well, it turns out that his DLL didn’t work for me, either. It seems that it’s just not compatible with 64-bit Windows 7, at least in my experience. I just could not get it to work. The Willem software would not detect the connected board. I looked at the homepage for inpout32, and apparently there is a 64-bit version, so maybe if I had fiddled long enough I could have gotten inpoutx64 to work, but at this point I actually had an idea of my own, after looking at the source code that Ben included for his DLL.

I knew from everything I had read that Toni’s 64-bit-compatible io.dll wrapper using TVicPort did work. All it was missing was the remapping. So I took Ben’s code and modified it to use TVicPort rather than inpout32.dll. (Alternatively I could have added the remapping to Toni’s code.) I only changed a few lines. I just changed the calls to inpout32.dll for reading/writing to use the corresponding TVicPort functions instead, and also added initialization and deinitialization code for TVicPort.

So I compiled it with Visual C++ Express Edition 2008…ran the “Test Hardware” function on the Willem software…and success! It found the hardware! I was stoked, so I grabbed a BIOS chip from an old motherboard I’m not using anymore (Asus A7V133). It’s a SyncMOS F29C51002T. I chose that model in the software, set up the DIP switches correctly, and stuck the chip in the cool ZIF socket on the programmer board. I then read the BIOS from the chip. I looked at the read buffer and it looked good! I saw stuff about an Award BIOS, so it sure looked like it was working. I happened to have a good copy of the same BIOS file from when I had messed with that same chip on the older computer, so naturally I did a diff against them to make sure that the file was read correctly.

It didn’t read correctly. It differed by just a few bytes. It was mostly OK, but mostly is not good enough when you’re reading to/writing from chips that contain computer code and/or data. At this point I decided to sleep on it and think about it the next day. That approach really works well in all aspects of life in my experience. When I had trouble learning to play a piano piece I would sleep on it and the next day it was like my brain had somehow prepared itself ahead of time, and I would play the part I had been struggling with perfectly.

The next day I noticed that the TVicPort driver actually has an option for two I/O port access “modes.” The default mode is hard mode, which is slower, but provides more reliable access to an I/O port if it’s already been opened by a different driver. Soft mode is faster, but has trouble if a port is already open by another driver. On a whim I decided to try out soft mode. I read the chip again, and this time it worked perfectly. I then erased it, wrote the file back, and compared it. Perfect. I did this several times just to make sure I wasn’t getting lucky, and it worked every time.

So either I got really unlucky on my first try with hard mode, or using soft mode fixed it. I don’t know which one is the case, but regardless, I now have my programmer working in Windows 7 64-bit. And this is the end of our Google adventure.

Google can do a lot of great things if you’re willing to sit down and search. And search. And search. I didn’t actually find all this stuff that easily. I tried many different searches, wording things slightly differently. I ended up only showing you guys the search queries I tried that gave me interesting results.

So…thank you to everyone I mentioned in my post. I’ve never met you or even corresponded with you, but you all helped me get this working. Thank you rabitguy, admin at onecamonly, Toni, and Ben. With all of your info I got it working.

So naturally, here’s my io.dll wrapper, based on Ben’s wrapper, along with the source code for it.
Remember, I’m not responsible for any damage done by this software–it’s been tested lightly and seems to work for me, but your mileage may vary!
Download 64-bit remapped IO.DLL wrapper and source code (new version 1.1 which fixes a bug–thanks Paco!)
You will also need to download TVicPort from here.

Install TVicPort, then restart your computer (mine didn’t work until I restarted, and it does ask you to restart). Replace the io.dll file in the Willem software directory (C:\Program Files (x86)\EPROM50 on my computer) with this patched version. Open up the io.ini file, replace the address there with your parallel port’s I/O address (make sure you keep the “0x” before the address or it won’t work), and put it in the same directory you just copied the DLL file to. Set the Willem software to use LPT1 (0x378). If everything is working correctly, you should be able to go to the Help menu and choose Test hardware, and it will say “Hardware present” in the status bar at the bottom.

If you need to compile the modified io.dll for yourself or make modifications, grab TVicPort.h and TVicPort.lib from the TVicPort installation (C:\TVicPortPersonal\Examples\MSVC) and put them in the project directory. After doing that it should compile.

Hope this helps anyone out there, and thanks again to everyone whose information and source code helped me out!

A quick note: To find your parallel port’s I/O address, go into the Device Manager and open up your parallel port. It’s in the Resources tab:

The I/O range that is 8 bytes long (in my case, 3000-3007) is the important one. So prefix the start address with 0x (so in my case, I ended up with 0x3000) and that’s the value you should put in the io.ini file.

Version History:

  • 1.1 – Fixed a bug where I was calling functions from DllMain that I should not have been calling, causing the DLL to not work for at least one person – August 15, 2011. [Download]
  • 1.0 – Initial release – October 9, 2010. [Download]

Recently I’ve been reading about how Flash has its own “cookies” where websites can store data, called Local Shared Objects. People who don’t like the possibility of being tracked often delete their browser’s cookies, but many people overlook the Flash Local Shared Object collection. I consider myself a savvy computer user, and I certainly didn’t think of them until the last couple of months.

Flash Player Settings Manager

You can edit the settings that specify which websites are allowed (and not allowed) to save flash cookies using Adobe’s web-based Website Storage Settings panel. Unfortunately, to be frank, it sucks. Why? I’ll tell you why:

  1. You can’t sort the list of websites. The order they appear in the list is totally arbitrary (to my knowledge). If I’m looking for a specific website to delete its cookies, I have to search through the entire list until I find it. I can’t use my brain to do a binary search on it, since it’s not sorted. 😉
  2. You can’t search for a specific website in the list. Honestly, if I could search for a site by name, I wouldn’t really care about complaint #1 above. But since I can’t, it also belongs on this list.
  3. The scrollable list of websites is only four items high. It’s bad enough that it’s in an arbitrary order, but searching through a long list is absolutely hellish when the list can only show four items at a time.

No offense intended toward the designer of this panel. I’m a developer, and I know I’ve made my fair share of UIs that could use some improvement. I doubt many people use the panel anyway, so it’s probably not high on any kind of priority list. Anyway, the point of this post is not to trash on Adobe’s settings manager, but it’s to recommend an alternative.

I was going to write my own editor for these storage settings, but then I discovered that BetterPrivacy already exists. It’s a Firefox extension that allows you to do pretty much everything the Website Storage Settings panel does, but in a much less masochistic manner. I didn’t do any searching for such an add-on for Internet Explorer, Safari, or Chrome, but they may exist. Anyway, I may still make an app to edit these suckers just for fun, although others probably already exist.

If you don’t mind forbidding all websites from saving Flash cookies, which may cause you to lose saved usernames in Flash websites (if that matters), you can forget having to deal with BetterPrivacy. Instead, delete all your Flash cookies in the Website Storage Settings panel I already mentioned, and then set the global size to zero (and “Never Ask Again”) at the Global Storage Settings panel. Doing so will prevent Flash from saving Local Shared Objects, period.

That’s all for now!

This is my first post. It’s nothing special–just making sure it all works okay.

So here’s the deal. In my time as a developer, I’ve done a lot of stuff. I’ve never bothered to document a lot of it. I’ve always thought it would be cool to write about stuff that I work on for future reference for anybody else (or even me). So now, when I do stuff, basic or advanced or whatever, I’m going to try to remember to write about it in this blog. It could be about compiling a toolchain on Mac OS X, it could be compiling an embedded Linux kernel, it could be about OpenOCD debugging on Windows with Eclipse, or anything else. The possibilities are endless. It might not even always have to do with computers. We’ll see!